Friday 30 November 2012

Kids Project: Easy & Fun Snowman Cookie...

 Where I live, it's winter for about 5 months of the year. Not kidding! It's not like that everywhere in Canada...I just happen to live in Canada's largest northern city.We have had a snowstorm in every month of the year...except for July! This year, we have had a full blanket of snow since the middle of October. Everything outside is freakin' frozen! We try to embrace winter with lots of fun winter activities and in my city, we are lucky enough to have over 12 outdoor rinks...in addition to indoor rinks. To celebrate winter....I created this fun snowman project as a fun activity for kids.
 
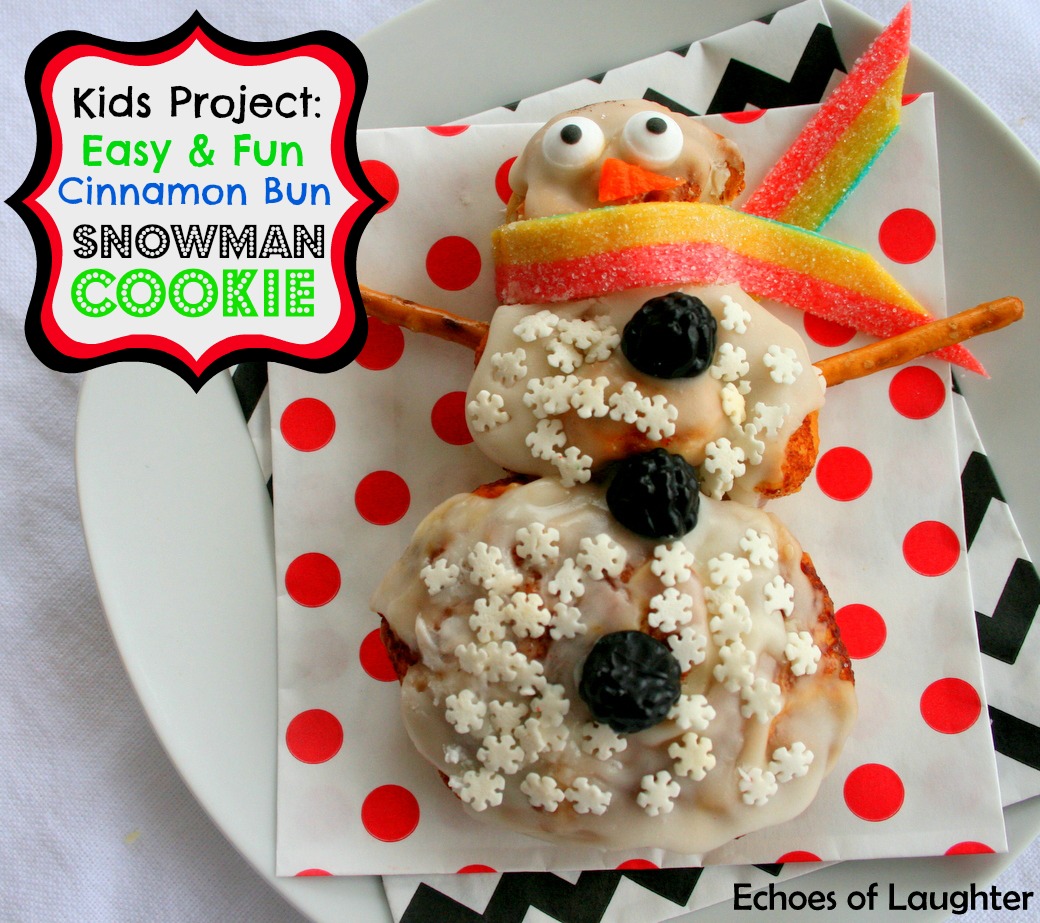
This is an easy project that can be created with a can of refrigerated cinnamon buns, so it's perfect for busy moms with crazy schedules during this holiday season. 
 

For this project you will need:
-A can of refrigerated cinnamon buns {You will need 2 buns per snowman.}
-white frosting
-pretzel sticks for arms
-candies & sprinkles for decorating the snowman to make buttons and eyes
-sour straps candy to make the scarf

Directions:

1. Use one cinnamon bun to make the bottom snowball for the snowman.

2. Take a second cinnamon bun and cut the outer ring of the bun off. Use this piece to make the head for the snowman. Let your child roll this into a ball for a head. Use the remaining piece of the bun to make the middle snowball for the snowman. Let your child assemble the snowman on a cookie sheet as shown.

 
3. Bake snowman as directed on the can of cinnamon buns. Let cool slightly.

4. Give your child the white frosting, a small spreader, pretzels, sprinkles and candies for decorating his/her snowman however they wish!

5. Eat and enjoy!


 Do you have snow in your neck of the woods? {I know without even asking that most of you don't!}


This post is linked to these great parties:
Tatertots and Jello, Under The Table & Dreaming, Craft-O-Maniac, Homestories A to Z,
Today's Creative Blog, Chef in Training, Inside Bru Crew Life, 33 Shades of GreenSavy Southern Style, Gingersnap Crafts, Lil Luna, Clean & Scentsible, The DIY Dreamer, It's Overflowing, I Heart Naptime, Not Just A Housewife, Tidy Mom, Project Inspire, Somewhat Simple, The Frugal Girls,

Ask Anna

Thursday 29 November 2012

Holiday Outdoor Decor 2012...

 Over the last week, I have finished most of my holiday decorating. Yay!
I have been tweaking things here and there, but my outdoor decor is done.
I forgot to take a picture to show you, but we have had snow~and lots of it~since the middle of October! So that means that gathering greenery myself...not so easy...everything is frozen already!
So when Superstore{ our local grocery+ store} advertised a very basic Christmas arrangement for $25, I was sold. After looking around at other stores and comparing prices, I thought it was a good deal and it fit my budget. {I don't plan to spend anything on indoor decor this year!}
But of course, when I got home, I added my own touches to make it my mine.
I added a red bow, poinsettias and some other pieces to dress it up.
 I really love having this little bistro table by the front door...it makes such an amazing disply space for whatever arrangement I have for the season.
 And the front door got this very traditional swag that I have had for several years.
I still love it and it still looks fresh.

Next week I will be sharing my indoor decor.
Have you started or finished your holiday decorating?
What was your colour scheme for this year?
 

This post is linked to these parties:
Frugal Girls, Tidy Mom, Craftberry Bush, Tatertots and Jello, Under The Table & Dreaming, Craft-O-Maniac, Homestories A to Z, Today's Creative Blog, Chef in Training, Inside Bru Crew Life,
Savy Southern Style, Gingersnap Crafts, Lil Luna, Clean & Scentsible, The DIY Dreamer, It's Overflowing, I Heart Naptime, Not Just A Housewife, Southern Hospitality, Tidy Mom, Project Inspire, Setting For Four, Aalderberry Hill, Between Naps on the Porch, The Nester's Tour of Homes,
Somewhat Simple,  The Frugal Girls,

Ask Anna

Wednesday 28 November 2012

4 Amazing Photo Gift ideas...

Today I thought I would share 4 photo project ideas from the Echoes of Laughter vault that would make great Christmas gifts for loved ones. Photo gifts make the best gifts to give because they remind us of what's important in life and can truly be enjoyed all year long.

1. Photo Memory Jar
This gift is so easy to make...all you need is a medium size jar, sand, a few embellishments and a photo or two.This is such a great memento of a special family trip as well. You can easily get the kids involved in this one too. {See the original post here.}

 
2. Shadow Box Project
Here is another gift idea when you want to use a group of photos. I picked up this shadow box for $14.99 from Homesense and added the photos and embellishments to the cream background.  Embellishments are very easy to find at any dollar store to add that special touch. {See the original post here.}
 

3. Photo Tray Project
This creation can take a bit more time than the previous 2 projects and takes a bit more skill if you are not a scrapbooker. This photo tray is made by 7 Gypsies and can found at Micheal's or a specialty scrapbook store. I made these trays 2 years ago as special Christmas gifts for the grandparents and I know they loved them.{See the original post here.}


4. Mini Scrapbook.
Any small tin makes a great start for a fun & unusual scrapbook. I made this little scrapbook inside a recycled altoid tin. It can fit easily into a purse for a busy Grandma and is also great for mailing away. {See the original post here.}


I hope you find an idea here that inspires if you are considering making something with photos!
 
Do you have any photo gifts planned for this year?
And are you making them or buying them?
Please share...I love hearing what special gifts others have planned!


This post is linked to these great parties:
Dixie n Dottie, Someday Crafts, 52 Mantels, Stone Gable, 36th AvenueFrugal Girls, Tidy Mom,
Craftberry Bush, Tatertots and Jello, Under The Table & Dreaming, Homestories A to Z, Today's Creative Blog, Chef in Training, Inside Bru Crew Life, Savy Southern Style, Gingersnap Crafts, Lil Luna, Clean & Scentsible, The DIY Dreamer, It's Overflowing I Heart Naptime, Skip To My Lou, Craft-O-Maniac, Not Just A Housewife, Tidy Mom, Project Inspire, Setting For Four, Aalderberry Hill, Between Nap on the Porch, Today's Creative Blog, Somewhat Simple,  The Frugal Girls,  Craftberry Bush,

Ask Anna

Monday 26 November 2012

Make Your Moments Golden...And A Chocolate Giveaway.

{This giveaway and contest is open to Canadian residents only.}
 
Hello dear readers!I am so excited to bring you another great giveaway just in time for Christmas!
And the giveaway is for this 200 gram package of Ferrero Rocher chocolates. I have loved these chocolates for years....they are one of my favourites! I don't know about you, but for me, a little piece of chocolate can turn a bad day right around! The answer is always chocolate!


Ferraro Rocher is hosting a special contest: Find a PIN in specially marked Ferroro Rocher 200 gram chocolates and you could instantly win over $500,000 in prizes including 1 of 10 Mercedes Benz All-New 2013 B-Class Vehicles or a Fererro Rocher Holiday Hosting gift basket. PINS can be redemmed on the the Ferrero Rochers Canada Facebook Page.


Please look for specially marked 200 gram Ferrero Rocher chocolates at your local retailer and you could win one of these fabulous prizes brought to you by Ferraro Rocher! {Here's a tip: The 200 gram box is the box of 16 wrapped chocolates in 2 layers of 8...turn the box over and it should say be marked with the Pin/Mercedes-Benz promotion in a red logo.}

Now here is a chance for you to win a 200 gram box of Ferraro Rocher chocolates. Please leave me a comment telling me who you would buy these chocolates for.  I will leave the comments open until Friday, November 30, 2012 at 6 pm MST. Then 1 random commenter will be chosen to receive a 200 gram box of Ferraro Rocher chocolates.

A Paper Bag Advent Calendar...

It's has been more than a few years since I last made an advent calendar, but when I saw these adorable itty bitty chevron bags,  I knew I just had to make something with them!
I got out my scrapbooking stash of punches, Christmas paper scraps, and other embellishments and spent some time creating this calendar.
I am so happy to be able to share it with you!


To begin, I used 2 frames that I already had from Pier 1 to hold pictures. I love these frames and I change the pictures in them from time to time. You could easily use large picture frames you have at home by stapling wire or string on the back to hold your advent calendar treat bags.I hung the two frames side by side to display the whole calendar in our hallway.
 Supplies:
Frames to hold the bags with wire or string to hold the bags {You could also just use string hung on a wall to hold the paper bags.}
25  paper bags
25 mini clothes pins
scrapbook embellishments & adhesive {I used tape runner}
Numbers 1-25,  print out or stickers { I used the numbers from this free printable.}

Directions:
  • Decorate the 25 paper bags with scrapbook embellishments and numbers however you like!You could also give some bags to the kids to help you decorate. It's a great family project.
  • Hang bangs from a string or wire when done.
  • Enjoy!


And what can you put in the bags?  Hersheys kisses, small candies or gum.Since my kids are older, I inserted slips of paper with questions on them for us to have a fun conversation at dinner.Some of the questions are:If you could give $10,000 to any charity for Christmas, which charity would you choose and why? What is the best Christmas surprise you've had so far?


I am busy working Christmas crafts and decorating this week, so I have lots of fun things to share soon.

What are you working on this week? Anything Christmas related? Please do tell!

{Thank you so much for Greenmunch for providing with the chevron paper bags to create my calendar. Please go check out their full line of beautiful party supplies!}


This post is linked to these great parties: Home Stories A to Z, Cozy Little House, Savy Southern Style, Gingersnap Crafts, Clean & Scentsible, Lil Luna, Uncommon, The DIY Dreamer, Dixie N Dottie, Someday Crafts, 52 Mantels, Stone Gable, 36th Avenue, Frugal Girls, Tidy Mom, Craftberry Bush, Tatertots and Jello, Under The Table & Dreaming, Craft-O-Maniac, Today's Creative Blog,  Chef in Training, Inside Bru Crew Life, It's Overflowing, I Heart Naptime, Skip To My Lou, Not Just A Housewife, Project Inspire, Setting For Four, Aalderberry Hill, Between Naps on the Porch, Somewhat Simple,
,
Ask Anna

Friday 23 November 2012

Christmas Cookie Week:Easy & Delish Confetti Squares...

Whew! It's the last day of "Christmas Cookie Week 2012" and my waistline sure is happy!
All of these yummy treats around are hard to resist!
This last recipe is a favourite everywhere I think...I see them on Christmas cookie trays sold at stores all the time...but they are so easy to make at home!
And really, this recipe is nothing special or unique, but it just reminds us that good things can also be easy!
And with just 4 ingredients & 10 minutes...you really can't go wrong!
It's perfect for a busy time of year...like Christmas.
 Confetti Squares

Ingredients:
1/2 cup butter
1 cup peanut butter
1 300 gram bag of butterscotch chips
1 bag fruit flavoured mini marshmallows

Directions:

1.Grease a 9x13 pan. In a large pot, melt butter, peanut butter and butterscotch chips on low heat. Stir with a spatula until mixture is smooth. Watch carefully because this is so easy to burn if you turn your back for a second.

2. Remove pot from stove and let mixture cool slightly. {You don't want the mixture too hot because it will melt the marshmallows.}

3. Mix marshomallows into peanut butter mixture. Pour into greased pan. Place in fridge to until squares are firm. Cut into squares with a sharp knife. Store in fridge.

You can serve these in cupcake liners to make them look dressed up for the party.

Thank you so much for joining me for "Christmas Cookie Week" here at Echoes of Laughter!  Please make sure you visit my friend Grace over at Sense & Sensibility to see what cookie she is serving up today!

And guess what else? The folks at Canada's Style At Home magazine contacted me today and asked me to share this news with  you! Style at Home is hosting a Cookie Swap and contest!   Here are the details:

How to enter: Send an original family cookie recipe and photo to cookieswap@styleathome.com

*No family recipe? No worries! You can use one on styleathome.com :) Be sure to include which one it is in your email

Contest dates: Nov. 21, 2012 to Dec. 14, 2012

Prize: KitchenAId 5-Quart Series Stand Mixer

Entries: Recipes will be published on styleathome.com (http://www.styleathome.com/food-and-entertaining/holiday-cookie-swap-recipes) starting Dec 1st, 2012

 
All the contest rules and details are outlined here: http://www.styleathome.com/cookieswap.


This post is linked to these great parties:
Tatertots & Jello, Six Sisters Stuff, It's Overflowing, I Heart Naptime, Positively Splendid, Under The Table & Dreaming, Home Stories A to Z, Cozy Little HouseSavy Southern Style,
Gingersnap Crafts, Clean & Scentsible, Lil Luna, Uncommon, The DIY Dreamer, 52 Mantels,
Stone Gable, 36th Avenue, Frugal Girls, Tidy Mom, Craftberry Bush, Poofy Cheeks, Today's Creative Blog, Chef in Training, Inside Bru Crew Life, 33 Shades of Green, I Heart Naptime, Not Just A Housewife, Project Inspire, Craft-O-Maniac, Aalderberry Hill, Between Naps on the Porch, Somewhat Simple,

Ask Anna

Thursday 22 November 2012

Kids Project: Easy & Fun Christmas Tree Cookie...

Happy Thanksgiving to all of my American readers! I hope you have a fabulous Thanksgiving! In Canada, we celebrated Thanksgiving in October, so we still have to wait until Christmas for another turkey dinner!

Welcome to Day 4 of Christmas Cookie Week! It's been such a great week where I have shared some other cookie creations that you can see here, here, and here. Today I am sharing a fun & easy baking project that is perfect for children!

When my kids were younger, I loved making special projects with them at Christmas!  And I wasn't always a stay-at-home mom...I used to work full-time outside the home and my kids went to daycare and  later school when they were old enough. Back then,  I was always on the lookout for simple, easy projects that didn't take a lot of time & preparation.

I know we have all seen those pretty Christmas trees made with full-size cinnamon buns...but I began to think what if there a tiny version...and made with a purchased can of cinnamon buns? How cute would that be? And if a can of pre-made cinnamon buns were used, how easy would that be?  And that is how this project began.

This project is designed for each child to make & decorate his or her own creation. The ingredient list is so easy that everything can be picked up at the grocery store on the way home from work!

Easy Cinnamon Bun Christmas Tree Cookies

Ingredients:
  • Can of Refrigerated Cinnamon Buns (Each can is enough for 1.5 cookies. Allow 1 cookie per child.}
  • Tube of Green Icing for decorating the tree, {plus the decorating tip that is in the display with the Green Icing tube}, or a purchased can of frosting, tinted green with food colouring.
  • Christmas coloured sprinkles of your choice.
Directions:

1. Cut each cinnamon bun in 4 pieces. Give each child 11 pieces for his/her tree. Ask them to roll 10 of the pieces into balls to make the tree.

2. Form the tree using 4 balls for the bottom row, 3 balls for the second row and 1 ball for the top row. Use the last ball to shape into a tree trunk.


3. Bake according to the directions on the can of buns. Let cool.

4. Decorate the tree with the tube of green icing or can of green frosting. {I used a tube of green frosting},

5. Sprinkle with Christmas coloured sprinkles.

6. Eat!

Now you have a super fun baking project that you can make with your child, grandchild, nieces or nephews, that can easily fit into a busy schedule.

Be sure to pop over to my friend Grace's blog, Sense & Simplicity, to see what fun she has been up to in the kitchen today!


This post is linked to these wonderful parties:
Tatertots and Jello, Six Sisters Stuff, It's Overflowing, I Heart Naptime, Positively Splendid, Under The Table & Dreaming, Craft-O-Maniac, Home Stories A to Z, Cozy Little House, Gingersnap Crafts, Clean & Scentsible, Lil Luna, Uncommon, The DIY Dreamer, Dixie N Dottie, 52 Mantels, Stone Gable, 36th Avenue, Frugal Girls, Craftberry Bush, Poofy Cheeks, Today's Creative Blog, Chef in Training, Inside Bru Crew Life, 33 Shades of Green, I Heart Naptime, Skip To My Lou,  Not Just A Housewife, Project Inspire, Aalderberry Hill, Today's Creative Blog, Somewhat Simple,

Ask Anna

Wednesday 21 November 2012

White Chocolate & Cranberry Sugar Cookies...

It's Day 3 of Christmas Cookie week and to make things super easy, this cookie has the same sugar cookie base as yesterday's cookie! Yay!
It's an easy drop cookie that you can whip up quite quickly, and then drizzle white chocolate and sprinkle with finely chopped craisins or dried cranberries.
You also have the option of adding some orange flavouring to the sugar cookie base for a fun flavour twist.
Yum!

Sugar Cookies
{makes approx. 4 dozen}
Ingredients:
1 cup butter
2 cups sugar
2 eggs
4 tbsp. milk or cream
2 tsp. vanilla or orange flavouring
3 1/2 cups of flour
4 teaspoons baking powder
1 teaspoon salt
1 teaspoon grated orange peel, optional
To Decorate:
1 1/2 cups white chocolate melting wafers, melted
1/2 cup finely chopped craisins

Directions:
1. Pre-heat oven to 350. In large bowl, cream together butter & white sugar. Add eggs, milk and vanilla and mix well.
2. In medium bowl, mix together flour, baking powder and salt.
3. Add flour mixture to butter mixture and mix until dough is formed.
4. Drop dough by teaspoonfuls onto cookies sheets. Press each cookie gently with fork.
5. Bake 6-10 minutes, or until cookies are puffed up and edges are slightly golden.
6. Cool completely on wire racks.
7. With a teaspoon, drizzle melted white chocolate on cookies and sprinkle chopped craisins.
 
If you would like to see the Christmas Cookie from Day 1 of Christmas Cookie Week, please go here.
For the cookie from Day 2, please go here.

And don't forget to pop over to my friend Grace's blog, Sense & Simplicity, to see what treat she has in store for you today!


This post is linked to these wonderful parties: Chef in Training, Tatertots and Jello, Six Sisters Stuff, It's Overflowing, I Heart Naptime, Positively Splendid, Under the Table & Dreaming, Home Stories A to Z, Cozy Little House, Savy Southern Style, Gingersnap Crafts, Clean & Scentsible,
Lil Luna, Uncommon, The DIY Dreamer, 52 Mantels, Stone Gable, 36th Avenue, Frugal Girls,
Tidy Mom, Craftberry Bush, Poofy Cheeks, Today's Creative Blog, Inside Bru Crew Life, 33 Shades of Green, I Heart Naptime, Not Just A Housewife, Project Inspire, Aalderberry Hill, Between Naps on the Porch,

Ask Anna

Tuesday 20 November 2012

Poinsettia Cookies...

Welcome to Day 2 of Christmas Cookie Week!
Today I am sharing a delightful little poinsettia cookie that is created on top of an easy drop sugar cookie.
The sugar cookie recipe is one of my tried & true recipes...just dressed up for a special occasion.
This cookies takes a little patience to decorate, but the pretty sure does make up for the extra effort!
And be sure to head over to my friend Grace's blog, Sense & Simplicity, to see what she has in store for you today!
 
 
Sugar Cookies
{makes approx. 4 dozen}
 
Ingredients:
1 cup butter
2 cups sugar
2 eggs
4 tbsp. milk or cream
2 tsp. vanilla
3 1/2 cups of flour
4 teaspoons baking powder
1 teaspoon salt
 
To Decorate:
2 cups of your favourite white frosting, or purchase white frosting
candied red cherries, cut into slivers
candied green cherries, chopped small
 
1. Pre-heat oven to 350. In large bowl, cream together butter & white sugar. Add eggs, milk and vanilla and mix well.
 
2. In medium bowl, mix together flour, baking powder and salt.
 
3. Add flour mixture to butter mixture and mix until dough is formed.
 
4. Drop dough by teaspoonfuls onto cookies sheets. Press each cookie gently with fork.
 
5. Bake 6-10 minutes, or until cookies are puffed up and edges are slightly golden.
 
6.  Cool completely on wire racks.
 
7. Frost cookies with white frosting. Add 5 slivers of red candied cherry to each cookie to make poinsettia. Add chopped green cherry to center.
 
These pretty poinsettia cookies would be so pretty for a Christmas tea or luncheon, and would also make a lovely star attraction on any cookie platter!
 
If you would like to see the Christmas Cookie from Day 1 of Christmas Cookie Week, please go here.


This post is linked these great parties: Beauty and Bedlam, The DIY Dreamer, Lil Luna, Uncommon,
Savy Southern Style, Gingersnap Crafts, Clean & Scentsible, Sweet Boutique, Someday Crafts,
Chef in Training, Tatertots and Jello, Six Sisters Stuff, It's Overflowing, I Heart Naptime, Positively Splendid, Under the Table & Dreaming, Craft-O-Maniac, Home Stories A to Z, Cozy Little House, Dixie N Dottie, Someday Crafts, 52 Mantels, Stone Gable, 36th AvenueFrugal Girls, Tidy Mom, Craftberry Bush, Poofy Cheeks, Today's Creative Blog, Inside Bru Crew Life, 33 Shades of Green, Skip To My Lou,  Not Just A Housewife, Project Inspire, Setting For Four, Aalderberry Hill,
Between Naps on the Porch, Somewhat Simple,

Ask Anna

Monday 19 November 2012

Christmas Cookie Week: Gumdrop Cookies...


Welcome to the 2nd Annual Christmas Cookie Week here at Echoes of Laughter! This year, my friend Grace from Sense & Simplicity and I are hosting another super fun Christmas Cookie week. Each day this week we will be sharing a yummy cookie or bar recipe with you in hopes of inspiring and motivating you to get some Christmas baking done early!

Today I am sharing a cookie recipe that is loaded with one of our family's favourite candies...the gumdrop. My mother makes gumdrop cakes every year at Christmas and mails one to us and we love that yummy pound cake loaded with these jelly candies. And although I have left the gumdrop cake making to the expert, I do like this easy drop cookie recipe which comes from my Aunt Zelma. This recipe makes a delicious, chewy cookie with the added fun of gumdrops. The colours make it a wonderful addition to any cookie platter.
 Gumdrop Cookies
{makes approx. 3 dozen cookies}

Ingredients
1 cup butter
1 cup white sugar
1/2 cup brown sugar
1 egg
1 1/2 cup all purpose flour
1/2 teaspoon baking soda
1/2 teaspoon salt
1 teaspoon baking powder
1/2 cup coconut
1-1/2 cups gumdrops, chopped {don't use black or white ones...they don't look pretty in a cookie}
1 cup rolled oats
coarse sugar for sprinkling on tops, if desired

Directions:

1. Preheat over to 375. Spray two cookie sheets lightly with cooking spray

2. In medium bowl, cream together butter, white sugar, brown sugar and egg.

3. In another bowl, stir together flour, baking soda, salt, and baking powder.

4. Stir flour mixture into butter mixture until combined.

5. Stir in gumdrops, coconut and rolled oats.

6. Drop by teaspoonfuls onto greased cookie sheets. Press down with a fork. Sprinkle with coarse sugar.

7. Bake for 10 minutes or until cookies are golden brown around edges.


These cookies freeze well. They also make an awesome cookie to leave for Santa too!

Be sure to come back tomorrow for Day 2 of Christmas Cookie Week! And please be sure to visit my friend Grace over Sense & Simplicity to see what fabulous cookie recipe she is sharing!


This post is linked to these parties: Cozy Little House, Beauty and Bedlam, The DIY Dreamer, Lil Luna, Uncommon, Savy Southern Style, Gingersnap Crafts, Clean & Scentsible, Sweet Boutique, Someday Crafts, Chef in Training, Tatertots and Jello, Six Sisters Stuff, It's Overflowing,
I Heart Naptime, Positively Splendid, Under the Table & Dreaming, Craft-O-Maniac, Home Stories A to Z, 52 Mantels, Stone Gable, 36th Avenue, Frugal Girls, Tidy Mom, Craftberry Bush,
Poofy Cheeks, Today's Creative Blog, Inside Bru Crew Life,  33 Shades of Green, I Heart Naptime,
Skip To My Lou,  Not Just A Housewife, Project Inspire, Aalderberry Hill, Between Naps on the Porch, Somewhat Simple,

Ask Anna

Sunday 18 November 2012

Goose Creek Candle Giveaway...

The lovely folks at Goose Greek Candle contacted me a few weeks ago and asked me if I would like to try out their candles and host a giveaway for my readers, and I was so excited to say yes and pass this giveaway on to you!
With winter here, we are inside all the time and it is so nice to have a lovely scent to warm things up a bit. Goose Greek Candle kindly sent me 2 beautiful American Heirloom candles...a 16 oz. in Orange Berry Slush and a 39 oz. candle in Maple Toddy. I love the multi-sided shape of the jars and they have a beautifully polished silver embossed lid which provides a quality look in any home decor. These scented candles smell so good and are top quality...the 16 oz jar candle will give approx. 90 hours of burning time, while the 39 oz. jar candle will burn for approx. 215 hours!
 
My 16 year old daughter is so thrilled with these candles that she confiscated the Maple Toddy jar candle from our living room to hide up in her bedroom and she lights it every day. She thinks they are just absolutely divine...and I do too!

 Here are the details of the giveaway:

1. Please visit the Goose Greek Candle website to view the candles. Choose the scent of the 16 oz. American Heirloom jar candle you would like to win.

2. Leave a comment on this post, telling me which scent you would like to win. Comments will be open for one week.{One entry/comment per person only.}

3. One winner will be chosen randomly from the comments to have their choice of a scented 16 oz. American Heirloom candle shipped directly from the Goose Creek Candle Factory directly to their home. {This contest is open to continental US residents only. Sorry to my Canadian readers!}

4. Goose Greek Candle is also offering 25% off entire orders to my readers until November 30, 2012. The coupon code to enter for this discount is: 1050.


That's it! That is all you have to do to win yourself a fabulous scented candle right before Christmas! How cool is that?

{Goose Greek Candle provided with me with 2 American Jar Candles to review for this post. However, all opinions are my own. This giveaway is open to US continental readers only. My Canadian friends..please come back later this week as I have 3 more giveaways coming up for Canadians only!}

that give mcdonalds coupons and 
breakfast coupons you also can find recipe from