Showing posts with label christmas cookies. Show all posts

Thursday, 19 December 2013

Chocolate Cherry Cookies {Gluten Free}

I love Christmas cookies and I love sharing them when people drop by to visit! With more and more people eating a gluten free diet for health reasons, I like to make sure that I have a few treats made for my gluten free friends and family that might pop by. This year I used my tried and true Chocolate Dream cookie recipe to whip up these cherry cookies....but with one simple change.
Williams Sonoma very kindly sent me a bag of their Cup 4 Cup Flour to try in some of my Christmas baking this year. I have never tried a gluten-fee flour alternative before, so I was intrigued to try out a new-to-me flour. To use Cup 4 Cup, you simply need to replace regular flour with an equal amount of Cup 4 Cup in the recipe to make it gluten free. Cup 4 Cup is a blend of rice flours and cornstarch and is recommended as a gluten-free replacement for all purpose flour for baking in quick breads, scones, muffins, cookies and biscuits. So I put it to the test with a favourite chocolate cookie recipe.
Chocolate Cherry Cookies 
{makes 3-4 dozen}
Ingredients: 
2 1/4 cups cups Cup 4 Cup Flour
1/2 cup cocoa
1 teaspoon baking soda
1/2 teaspoon salt
1 cup (2 sticks) butter or margarine, softened
1 cup packed brown sugar
3/4 cup granulated sugar
1 teaspoon vanilla extract
2 large eggs
2 cups semi-sweet chocolate chips.
1 cup glazed red cherries, cut in half


Directions: 
PREHEAT oven to 375° F.
1. COMBINE flour, cocoa, baking soda and salt in a small bowl. 
2. Beat butter, brown sugar, granulated sugar and vanilla extract in a large mixing bowl until creamy. Beat in eggs for about 2 minutes or until light and fluffy. Gradually beat in flour mixture. Stir in chocolate chips. Drop by rounded tablespoon onto ungreased baking sheets. Add cherry half to the top of each cookie.
2. BAKE for 8 to 10 minutes or until cookies are puffed. Cool on baking sheets for 2 minutes; remove to wire racks to cool completely. 
I found these cookies turned out great and there was no difference between using regular all-purpose flour and Cup 4 Cup flour in this recipe. The cookies were chewy on the oustide, soft on the inside and just as deliciously good! The kids thought so too!
And although we all taste-tested some from this batch of cookies, I did manage to put some away for Christmas visitors who may be dropping by in the next few days!
This same chocolate cookies recipe can also be used to make:
Peppermint Bark Cookies

How is your Christmas baking coming along?
Have you made any gluten-free treats this season?

Thank you so much to Williams Sonoma for providing me with Cup 4 Cup Flour for purposes of review. As always, I only work with brands/products that I use in my own home and all opinions are my own.


This post is linked to:
Inspire Me Please, I'm Lovin It, Inspiration GalleryThe Party BunchLink Party Palooza,

Friday, 6 December 2013

Cherry Slice Icebox Cookies

I clearly remember my mom making 'icebox' cookies when I was a little girl. They are a marvel to have in the fridge at Christmas time....just take out and slice and bake! Mixing up the easy dough before is key, but this recipe is very easy to make up as it only take a few minutes. And they taste wonderfully of a brown sugar dough with the sweet taste of cherries.

These types of  'icebox cookie' recipes have been around for years...and were the original convenience type cookies. Here is an old recipe found on the Purity Flour spiral bound cookbook, and with any luck, you likely have many of the ingredients already.

Cherry Slice Icebox Cookies
{makes 4 dozen cookies}

Ingredients:
1/2 cup butter
2 cups lightly packed brown sugar
2 eggs
1/2  teaspoon vanilla
2 cups flours
1 teaspoons baking soda
1/2 teaspoon salt
3/4 cup diced glazed cherries

Directions:
1. Using mixer, cream together butter, brown sugar  & vanilla.
2. Beat in 2 eggs and beat until light and fluffy.
3. Stir in dry ingredients and mix. Add in cherries.
4. Turn out soft dough onto counter. Divide in half.
5. Shape each dough ball into a log about 2 inches thick. 
6. Wrap in saran wrap and refrigerate for 4 hours.
When ready to bake, take log from fridge. Remove saran wrap and roll in sugar if desired. Slice into cookies about 1/4 inch think. Place on greased cookie sheets. Bake at 350 oven for 4-6 minutes...watching carefully not to burn.
This is an excellent basic recipe to keep on hand in the fridge. You could also add nuts if you desire. 
They make an excellent cookie to serve warm  to kids with glasses of milk or hot chocolate after playing outside in the snow.
They also make a wonderful cookie to fill a tin for a Christmas gift for someone special or to take into the office. And what an excellent gift this would make for a busy mom...just give her the rolls of uncooked dough so they could be baked as needed.
And in case you missed the rest of the week:
Please don't forget to skip over to see what the rest of the Christmas Cookies Week Friends are making today too!


Thank you so much for visiting! 


This post is linked to:
The Party Bunch, Link Party Palooza, The Sunday Showcase, The Block Party, Monday Funday, Gingersnap Crafts, Tidy Mom, Inspiration Gallery, Holiday Recipe Link Party, Kitchen Fun With My 3 Sons, DIY Party Time, Time To Sparkle, All Things Christmas Link Party,

Thursday, 5 December 2013

Christmas Petit Fours {Christmas Cookie Week #ChristmasCookies}

Hello everyone! I cannot believe it's Day 4 of cookie week already. It's been so fun sharing some of my Christmas baking with you! I hope you have been inspired and found a new recipe or two from among the 8 bloggers partying together!

My 'cookie' today is actually something very simple for the non-baker! It's made with pound cake that you buy at the grocery store, and then you add special touches at home to create a special little somethin' somethin' that looks pretty on any Christmas plate!

This is also a great project to make with kids and perfect for the super busy mom who doesn't enjoy baking.
Here's how it's done!

Christmas Petit Fours

Ingredients:
Pound cake, cut into one inch cubes
Icing sugar {powdered sugar for frosting}
Red food colouring
Christmas sprinkles

Directions:
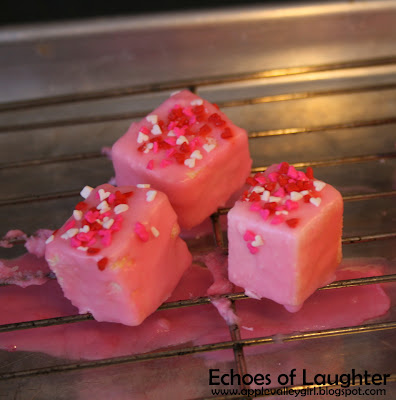
1. Using a medium size bowl, make thin icing with water and icing sugar. Add red food colouring.Make sure that it's fairly thin to that the pound cake cubes can be coated with the frosting.
2. Place one or two pound cake cubes on a skewer. Dip into frosting in bowl and use spoon to help pour frosting over cubes until fully coated.
3. Place cubes on cooling rack and add sprinkles to tops. Let dry.

{Shown below are Valentine's Petit Fours}
Then add the pretty petit fours to a plate and serve.
They look so fancy for very little work!

And they taste delicious too....just like tiny bites of cake!


Don't forget to skip on over to see what the rest of the Christmas Cookies Week Gang is making today too!


Thank you so much for visiting! 


See you with another cookie treat tomorrow!


This post is linked to:
Inspiration Gallery, I'm Lovin' It, Inspire Me Please,  Kitchen Fun With My 3 Sons, The Party Bunch, Link Party Palooza, The Sunday Showcase, Block Party, Monday Funday, Craft-O-Maniac, Gingersnap Crafts,  Liz Marie Blog, Tidy Mom, Holiday Recipe Link Party, DIY Party Time, Block Party, Time To Sparkle, 

Tuesday, 3 December 2013

Christmas Chip Cookies {Christmas Cookie Week-#ChristmasCookies}

One of my favourite ways to whip up a bunch of easy Christmas cookies is to take a family recipe and change it's 'outfit'. You know...dress 'em up for Christmas with some candy, sprinkles or melted chocolate. While walking the aisles of bulk barn recently, I came across 'Vanilla Christmas Chips' and I said immediately, "You are coming home with me!" I knew that they would be an easy sell with kids..I mean C'MON...they looks so cute and Christmas-y!

Once at home, I knew these cute morsels had to jump into a batch of chocolate chip cookies...minus the chocolate chips of course. These chips are smaller than normal chocolate chips and taste like vanilla. My kids loved them!  I also added some frosting and more little chips on top just for fun!
And just in case you don't have a family favourite chocolate chip cookie recipe, I'll share mine with you! Cause I'm nice like that!

 Our Family's Best Chocolate Chip Cookies
Makes 4 dozen.
Ingredients:

1 1/2 cups butter

1 cup white sugar

1 cup brown sugar

2 eggs

2 teaspoons vanilla

3.5 cups flour

1 teapsoon salt

1 teaspoon baking soda.

2 cups Christmas chips


1. Cream together butter,white sugar and brown sugar with mixer until light and fluffy. Add eggs one at a time. Add vanilla. Mix well.

2. In separate bowl, mix together flour, salt & baking soda. Add flour mixture to butter/sugar mixture. {Not all at once or you will have a big white cloud!} Mix for about 2 minutes. Add christmas chips and mix until just spread out evenly in batter.

3. Scoop onto cookie sheets with small cookie scoop or teaspoon.

4. Bake at 350 degrees for about 8-12 minutes.

5. Remove from oven when cookies are just barely brown around the edges and puffed up.Let cool. The cookies will sink a little as they cool...this is good!It means that the texture will be soft and chewy.

I think that these make the most adorable Christmas cookies for kids! They are colourful and bright, easy to make and taste wonderful! 

And in case you missed Day 1, here are my Peppermint Bark Cookies

Don't forget to hop on over to see what the rest of the Christmas Cookies Week Gang is making today too!


Thank you so much for visiting! 
See you with another cookie treat tomorrow!

Linking up with:
Show Me What You Got, The DIY Dreamer, Gingersnap Crafts, I Gotta Create, Inspiration Gallery,  I'm Lovin' It, Liz Marie Blog, Kitchen Fun With My 3 Sons, The Party Bunch, Link Party Palooza,  The Sunday Showcase, The Block Party, Monday Funday,Christmas Chip Cookies, Holiday Recipe Link Party, The DIY Party Time,  Time To Sparkle,

Monday, 2 December 2013

Peppermint Bark Cookies {Christmas Cookie Week-#ChristmasCookies}

Welcome to Christmas Cookie Week 2013! This year, 8 bloggers have come together to share a daily recipe for yummy and delicious cookies that we hope will inspire you during this season of Christmas baking! We come from different parts of Canada, with one friend joining us from Alabama, but we all share a joy of baking which makes for love…fresh from the oven!

Peppermint Ice Cream. Peppermint Bark. Mmmm. They are favourites of mine during the holiday season. And the Peppermint Bark from Williams Sonoma...total awesome-sauce! So, so good! I thought it would be fun to de-construct this treat and re-imagine them as cookies for the Christmas treat plate! This recipe essentially combines the flavours of the bark into a cookie. I have a favourite double chocolate recipe that I thought would be the perfect starting point for these lovelies.

 But first I must give you a peek of my kitchen on Saturday. I was 'Busy Baker Betty' baking Christmas cookies all day. My kitchen counter was an absolute riot of cookies everywhere. It was fun and productive, but I could not wait to put my feet up at the end of the day.
So back to the peppermint bark creation.
These are not hard to make and if you already have a favourite double chocolate cookie recipe, then I would use that! If you don't, I have one to share that makes a lovely crispy-on-the-outside-soft-and-chewy-on-the-inside cookie with very basic ingredients!

Chocolate Dream Cookie Recipe
{makes 3-4 dozen}
Ingredients: 

2 1/4 cups all-purpose flour

1/2 cup cocoa

1 teaspoon baking soda

1/2 teaspoon salt

1 cup (2 sticks) butter or margarine, softened

1 cup packed brown sugar

3/4 cup granulated sugar

1 teaspoon vanilla extract

2 large eggs

2 cups semi-sweet chocolate chips.

2 cups white chocolate melting wafers

Pure peppermint extract

1 cup crushed peppermints or candy canes


Directions: 

PREHEAT oven to 375° F.

1. COMBINE flour, cocoa, baking soda and salt in a small bowl. Beat butter, brown sugar, granulated sugar and vanilla extract in a large mixing bowl until creamy. Beat in eggs for about 2 minutes or until light and fluffy. Gradually beat in flour mixture. Stir in chocolate chips. Drop by rounded tablespoon onto ungreased baking sheets.

2. BAKE for 8 to 10 minutes or until cookies are puffed. Cool on baking sheets for 2 minutes; remove to wire racks to cool completely. 

3. When cookies are completely cooled, melt white chocolate wafers 1 cup at a time. {Melt gently in microwave at 20 second increments, stirring with a spoon until smooth.} Add 1 tsp. peppermint extract to melted white chocolate. Stir.

4. Spoon 1 tsp. white chocolate on top of each cookie and using back of spoon, swirl to cover top of cookie. Sprinkle with crushed candy cane or peppermints and let set for an hour.

Now sit back and enjoy a cookie that has those lovely flavours of chocolate and peppermint that go so well together!

Here are my other lovely co-hosts for Christmas Cookie Week!
Please make sure you visit the links below to see what each blogger has whipped up this week to share with you! 


Thank you so much for visiting! 
See you with another cookie treat tomorrow!

Linkin`up with:
Homestories A to Z, Time To Sparkle, Chef-In-Training, One Project At A Time, Take A Look Tuesday,Show Me What You Got, The DIY Dreamer, Gingersnap Crafts, I Gotta Create, Inspiration Gallery, I'm Lovin' It, Inspire Me Please, Kitchen Fun With My 3 Sons, The Party Bunch, Link Party Palooza,  The Sunday Showcase, The Block Party, Monday Funday, Craft-O-Maniac, Holiday Recipe Link Party,  Time To Sparkle,

Friday, 15 November 2013

Christmas Cookie Decorating Kit In A Cup for Kids

One of my very favourite things to do for Christmas when I was a kid was decorating sugar cookies! My mother used to make rolled & cut sugar cookies by the pan and give us pale pink and green frosting along with those little silver balls to decorate and it was total awesome-sauce for us kids! I honestly dont know a kid alive who doesnt love decorating cookies...even if its only for 5 mintues before they run off to play. I though that COOKIE DECORATING KITS IN A CUP would be perfect for kids AND busy moms!
These kits are not hard to put together at all! You don't even need to bake anything if you don't have time.

Here's what you will need:
Small sugar cookies, homemade or bought
Small tube of decorating gel {very inexpensive $1.50 each, or you could also use homemade icing in a small food bag and then snip the corner to use it.}
Small bag of sprinkles {I made my own little bag with sprinkles and small food bags.}
Paper cups

Directions: All you need to do is to put a couple of sugar cookies in a cup, along with some decorating gel and some sprinkles and the kit is complete! 
Then wrap them in cellophane wrap, and finish with a little ribbon and a tag...perfect for gift-giving!
How cute would this be for a Christmas party or Christmas activity for kids?
And I think it would be so awesome for a kids' together with their cousins or friends and everyone should be very happy with their own little kit. And what  a lovely gift this would make for a busy mom with kids. It could be an activity that she could enjoy & relax with them without having to do anything! Just give each child a small plate for their cookies, let them squeeze out the gel and decorate away.
And really, how cute is the packaging too? 
So if you are looking for a small gift to give to a few kids in your life, this might be the perfect bit of homemade and fun that any child would love to receive!


Linkin Up With :
Link Party Palooza, Uncommon Designs, Craft-0-Maniac, Block Party, Time To Sparkle, Home Stories A to Z, Take A Look Tuesday, Chef In Training, The Scoop, Savvy Southern Style, Super Saturday Show & Tell,  The Party Bunch, Sunday Best Linky Party, Inspiration Monday, Made By You Monday,  Metamorphosis Monday, One Project At A Time, Party Junk, Christmas Wonderful Link Party, Chef-In-Training, Homemade Gift & Wrap PartyAll Things Christmas Link Party, 

Thursday, 20 December 2012

13 Deliciously Easy Christmas Cookies...

 Today I want to share with you my easy go-to recipes for Christmas Cookies.You know a little trick of mine? I like to take my normal repertoire of cookie recipes....you know...the familiar cookies that you have made many times and you are good at making and then 'dress them up' in some way for Christmas....like adding special things like chocolate, drizzles or frosting.
This trick keeps things simple and stress free.
I am not left trying unfamiliar recipes at a busy time of year!
If you think about it, I am sure that you, too, have tried & true recipes that can be dressed up for Christmas!
 
 Here are my FAVS:
 
 1. Easy Drop Sugar Cookies. This is my Grandmother's recipe and I have made it so many times! I love them because they are not only easy, but very tasty and delicious as well. Here the cookies are dressed up with some Christmas-coloured sprinkles.
 
 
2. Poinsettia Cookies. These are simply easy drop sugar cookies dressed up with frosting & cherries to make poinsettias.
 
 
 3. White Chocolate & Cranberry Sugar Cookies. Easy drop sugar cookies with white chocolate drizzled on top with diced craisins. 
 
 
4. Reindeer Cookies. Here I have used the easy drop sugar cookie recipe again, along with pretzels and candies to make the reindeer. 
 

5. Chocolate Dreams. This is a drop cookie that is soft and chewy and so good. Here the cookies are dressed up with drizzled white chocolate and crushed candy canes.

 
6. Chocolate Dreams with Christmas-coloured M & Ms.
 
 
7. Gingerbread Softies. This recipes makes a nice soft cookie with a wonderful flavour.
 

 8. Gumdrop Cookies. A fun drop cookie made with colourful gumdrops.
 

9. Confetti Squares. These are very easy to make...just melt some ingredients on the stove top and pour into a pan.
 

10. Cherry Balls. These are perfect if you are not a baker. This is a filling wrapped around a cherry and rolled in graham cracker crumbs.


11. Pretzel Hugs. I have made these little gems with my kids for years. We have given them out for teachers' gifts. Another perfect project if you are not a baker!


12. Easy Cinnamon Bun Christmas Tree. This is a great project for kids. It uses a can of purchased cinnamon buns cut into pieces and rolled into balls to make the tree. Simple dimple!

 
 13. Cinnamon Bun Snowman. Another great creation for kids to try. A can of cinnamon buns cut into pieces to make a snowman decorated with candies.
 
I love making cookies and giving them as gifts...especially for
 friends who are not bakers or
who have little ones and not much time for baking.
 
 
What is your favourite Christmas cookie?


This post has been linked to these parties:
Tidy Mom, Somewhat Simple, The Frugal Girls, Craftberry Bush, It's Overflowing,
that give mcdonalds coupons and 
breakfast coupons you also can find recipe from