Showing posts with label breakfast. Show all posts

Friday, 20 December 2013

Last Minute Pancake Mix Gift Idea

Our family loves homemade pancakes and they are so easy to make with just a few basic ingredients. The job of making pancakes takes just literally minutes...especially if things are pre-mixed and ready to go. Today I am sharing with you our BEST pancake recipe mix, that makes beautifully light & fluffy pancakes, and when the dry-ingredients are pre-mixed, it makes a fantastic gift when paired with a bottle of maple syrup or even a flavored butter.
Here is the recipe that our family has used for years and years. The recipe is tripled so it make a nice big bag of pancake mix for gift-giving.

Pancake Mix
{makes 3 batches of pancakes}

Ingredients:
4 1/2 cups flour
3 tbsp. white sugar
9 tbsp. baking powder
1 1/2 tsp. salt

To Make:
1. Sift ingredients together. Pour into a large bag.
2. With Pancake Mix, include directions to make 1 batch of pancakes as follows:
Measure 1 3/4 cups pancake mix into large bowl. In separate bowl, mix together 1 egg, 1 3/4 cup milk and 2 tbsp. vegetable oil. Make a well in center of dry ingredients and add milk & egg mixture. Stir gently until just mixed. Let batter rest for 1 minute. Using 1/2 cup measure, scoop batter onto hot griddle. Cook one side of pancakes until edges are slightly browned, then flip over and continue cooking until edges are browned. Serve with syrup. Makes 8 pancakes.
And I made the bag pretty by adding a chalkboard label and then I used red stickers for the title.
And the gift also looks super cute if you add a small spatula to the package too.
{I found the small Santa spatula at Target.}
And now you have a great gift for a family or friends. And it would make the most wonderful Christmas gift too!
And if you wanted, you could include this super wonderful Strawberry Butter too....it is heavenly on pancakes with syrup.
Wishing you a wonderful pancake breakfast!


This post is linked to:
The Party Bunch, Link Party Palooza,

Monday, 14 October 2013

Pina Colada Breakfast Parfait +Giveaway #OpaYopa

Breakfast. It's a favorite 'kick off' to my day and I love ALL breakfast food...whether it be simple or takes a bit more effort. My new favorite is this simple breakfast parfait which is not only delicious for breakfast but can be a yummy dessert or snack anytime as well. Sometimes I have moments where I just need a little treat, and this is perfect for a quiet late morning breakfast...when the house is quiet and the kids are at school. I sit quietly for a 5 minute break from work and I indulge my taste buds!


And honestly, who can resist anything with whipped cream and a cherry on top?
The best part? It only takes 2 shakes and a jiff to create.
I made this tasty dish with the new Yopa yogurt, which comes in 5 delightful flavours!
Did you know that Yopa Greek Yogurt is not only delicious, but has double the protein of regular yogurt, contains no gelatin, artificial colors/flavors, 0% fat and only 60 calories per serving?
And all of the flavours taste so good! 

Pina Colada Breakfast Parfait
{makes 1}

1/4 cup diced pineapple
1/4 cup diced cherries
3/4 cup of Pina Colada Yopa Greek Yogurt
1 teaspoon of flakes coconut
1 tablespoon of whipped cream
1 cherry for garnish

Directions:
1. In parfait dish, add pineapple and then cherries.
2. Add pina colada yogurt on top of fruit.
4. Sprinkle coconut.
5. Garnish with whipped cream and cherry. Serve or refrigerate until serving time.

I cannot tell you how good this is, but as soon as I put my camera down moments after shooting this, this parfait dish was empty. I just could not wait!
It was THAT good!
 And with 8 grams of protein in each serving of Yopa Greek Yogurt, I know that this will hold me over until lunch.
 And this parfait can also be made with any of the other flavours by changing up the fruit and using mango with Mango Tango, or berries with Very Berry Lush, for example.

So go ahead and treat yourself to a moment with a pretty parfait and the new tastes of Yopa Greek Yogurt!

And to help celebrate this new yogurt, one lucky reader will win a YOPA prize pack worth $100!

To Enter:
1. You must be 18 years of age and live in Canada.
2. Please leave a comment sharing which flavour of Yopa Greek Yogurt you would like to try.
3. Entries will be accepted before now and midnight PST on October 19, 2013.
4. Make sure there is a valid email address attached to your comment so I may contact you if you are the winner.
Good luck!

Disclosure-I am participating in the YOPA Blogger Campaign by Mom Central Canada on behalf of General Mills, and received compensation as a thank you for participating and sharing my honest opinion. The opinions on this blog are my own.


This post is linked to:
Gingersnap Crafts, Savvy Southern Style, The Inspiration Exchange, Liz Marie Blog, Kitchen Fun With My 3 Sons,  The Inspiration Gallery, Chic & Crafty  Party, Whipperberry, Link Party Palooza, Share Your Creativity,  Super Saturday Show & Tell, The Sunday Showcase, Block Party, Craft-O-Maniac,

Wednesday, 14 August 2013

Back To School Breakfast Bash

Even though we are celebrating the start of school with a special 'Breakfast Bash', I have to admit that I am feeling a little sad for the start of school this year. Just like mommies feel sad when they have a little one start school for the first time, I am feeling sad because my oldest is starting school for the last time...it's her senior year.
The years have flown by faster than I could have ever imagined and I cannot believe we are here already.
But I guess it's all the more reason to have some fun...because we made it!
And fun we will have with some cute owls, take home cookies in paper bags, pancakes, bacon, fruit salad and mini cinnamon buns.
I just could not resist these adorable little owls on mini-clothespins I found. So perfect for a back to bash, don't you think?
Inside these paper bags are cookies to take to school, along with 2 new pencils.
I created a centerpiece with my favourite fall flower...sunflowers.
And I made super-duper fluffy mini-pancakes with bacon.
Mini-cinnamon buns from the local grocery store round out the menu for baked treats.
And a deliciously festive fruit salad completes the meal.
A special day like the first day of your last year of school deserves a wonderful breakfast!
And even if you don't have time to make anything special, some store-bought muffins with a fruit tray would be just as special! It's all really just about marking the occasion with people you love.
Do you have any special traditions to celebrate the beginning of a new school year?
Please share in the comments...I would love to hear about them!

And if need some help in packing school lunches, I have some helpful posts on packing school lunches here and here.

And for more back to school ideas, don't forget to have a peek at these boards on Pinterest:

Wishing you a wonderful day! 

This post is linked to:
The 36th Avenue, I Gotta Create, The Frugal Girls, Tidy Mom, Kitchen Fun with My 3 Sons, Liz Marie Blog, Inspiration Gallery, Link Party Palooza, It's Overflowing, What's Cooking With Ruthie, Under The Table & Dreaming,  Craft-O-Maniac, Uncommon, Aalderberry Hill, A Pretty Life, Skip To My Lou,  Homestories A to Z, Time To Sparkle, Chef-In-Training, Sugarbee Crafts, The DIY Dreamer, Gingersnap Crafts, Inspiration Exchange, Savvy Southern Style, Link Palooza, Block Party Linky Party,  Tidy Mom, The Frugal Girls,Whipperberry,

Monday, 12 August 2013

A Great Grab & Go Breakfast for Teens

Has anyone else noticed the irony of parenting and sleep issues? When our kids were babies, we spent a lot of time trying to get them to go to sleep. Then when they were toddlers, we spent a lot of time trying to get them to go to bed and stay in bed. And then along come the teenage years, and now we spend a lot of time trying to get them to wake up and get up!
And getting up late means no time for a sit-down breakfast!
I have 2 teens in my house, and school mornings are more like the Olympics of trying to get them up for school. I open bedroom doors, make threats of making people walk to school, play loud music, but often I see a child running out the door at the very last minute possible. Sleep is just too important at this age that the morning routine of eating breakfast before school just doesn't happen anymore.
Which is why I am so glad that there is the option of YOP...the drinkable yogurt. 
My son loves them. I mean 'drink them all day' LOVES them.
He has a very busy schedule with hockey almost every day of the week, so getting something fast & nutritious into him for breakfast is important.
For this reason, I like having the option of YOPS in our fridge all the time, and I often pack 1 or 2 in his lunch.

YOPS are available in a lot of delicious flavours and provide a great source of energy...and they take about 2 seconds to drink...at least in my house that is all it takes!
YOPS make a great grab & go breakfast for busy, but sleepy, teens and are a terrific option to have on hand whether it be breakfast, snack or anytime.

To learn more about YOP and other upcoming promotions, please visit the Life Made Delicious Facebook Page!

Disclosure-I am participating in the Help YOP Help You Blogger Campaign by Mom Central Canada. I received compensation as a thank you for participating and for sharing my honest opinion. The opinions on this blog are my own.


Friday, 17 May 2013

Delicious Chocolate & Strawberry Breakfast Pizza


Here are Echoes of Laughter, we are proud to announce the birth of a favorite new breakfast....introducing the fast, easy & delicious Chocolate & Strawberry Pizza.
Oh! How I love this fabulous treat for breakfast! And is there anything better than the flavour combo of chocolate & strawberries?
The birth of this delicious breakfast pizza began when our family spotted the new Chocolate Philly in the grocery store and it came home with us. Since Philly Cream Cheese is a regular at our house, we could not resist the temptation of a new flavour to try!
And this simple breakfast dish has become THE thing at our house.
The kids love it and as soon as they smell something in the toaster, they appear in the kitchen!
Philly Chocolate & Strawberry Breakfast Pizza

Ingredients:
Bagel
Chocolate Philly Cream Cheese
Fresh strawberries, sliced

To make: Toast bagel and then spread with Chocolate Philly & fresh sliced strawberries.
This is so easy that kids can make it for themselves!

If you haven't tried the new Chocolate Philly yet, it is ah-mazing! Our whole family loves it.
With Chocolate Philly you get the dairy goodness of Philly plus the deliciousness of pure milk chocolate-with half the sugar and calories (per 1 tbsp. serving) of the other guys.
And as a busy mom who needs an occasional break, I  have put my order in for my next 'breakfast in bed' treat to my family. {wink, wink.}

If you haven't had the chance to try the new Chocolate Philly yet,  as of May 21st, Chocolate Philly will be offering a new coupon that can be downloaded from the Philly Facebook page for a limited time.
And in addition to the coupon, you can also join in
 Chocolate Philly's FB Breakfast in Bed "Likes" Challenge.
http://adserver.adtechus.com/?adlink|3.0|5282|2788943|1|16|AdId=4272446;BnId=1

To download the coupon and find out more about the Breakfast in Bed "Likes" Challenge,
visit the Philly Facebook Page HERE.
Now please excuse me while I go get smoochy-woochy in the corner with my Chocolate Philly and some fresh strawberries.  **SWOON**

{Disclosure: The products mentioned above are part of a sponsored post for Kraft Canada. However, all opinions expressed are my own and we love Chocolate Philly.}


This post is linked to these parties:
Tatertots and Jello, Whipperberry, It's Overflowing, I Heart Naptime, Craft-O-Maniac, Uncommon Designs,  Uncommon Designs, Aalderberry Hill, Under The Table & Dreaming, Skip To My Lou, Lil' Luna,  Gingersnap Craft, The 36th Avenue, I Gotta Create, StoneGable, Somewhat Simple, Kitchen Fun With My 3 Sons,  The Frugal Girls, Design, Dining & Diapers, Becoming Martha, Cooking With Ruthie,  It's Overflowing, I Should Be Mopping The Floor,

Friday, 15 March 2013

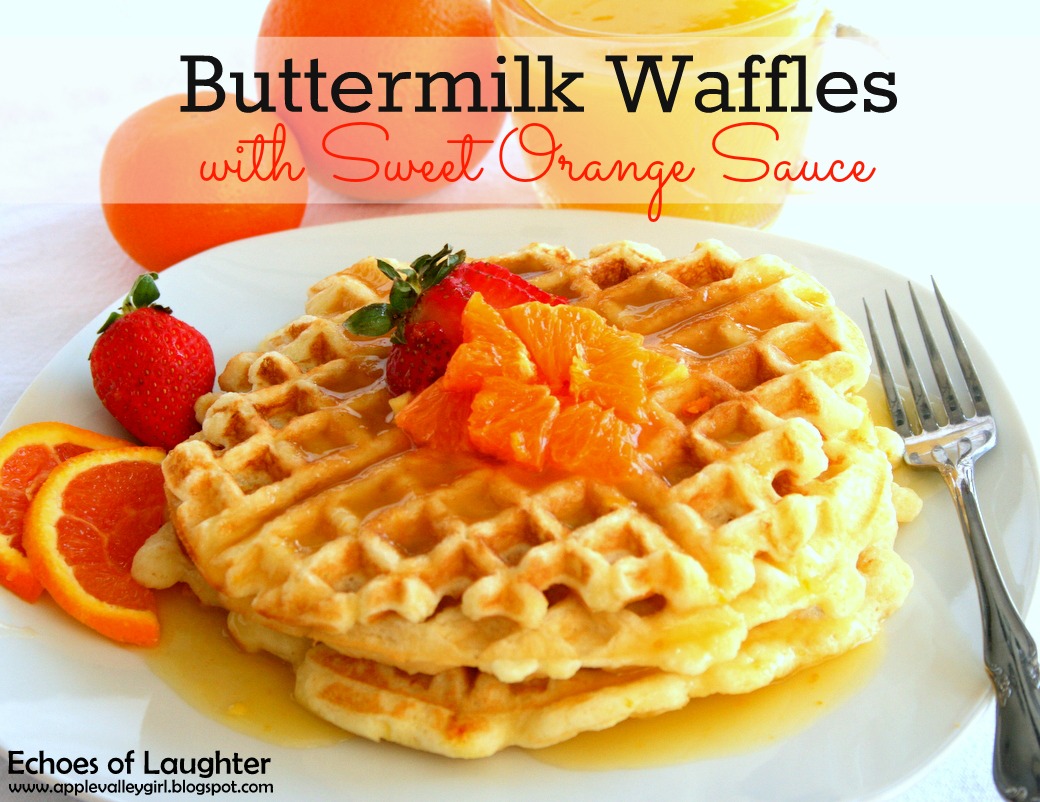
Buttermilk Waffles with Sweet Orange Sauce

There is no better smell  than the smell of homemade waffles steaming in a waffle maker. It tells the whole house that something good is coming. We have homemade waffles often at our house...at least once a week. My kids love homemade waffles and are happy to eat them for breakfast, lunch or dinner. My daughter has been crazy over  the wonderful citrus at the market lately...eating tons of Cara Cara oranges and Ruby Red grapefruit, so I wanted to incorporate some of those flavours into some waffles just for her. She has been working hard in school lately with late night study sessions and papers due, so I wanted to do something special for her. I came up with a sweet sauce...kissed with the flavour of citrus...and paired it with easy buttermilk waffles.  If you have never made homemade waffles before, let me assure you that they are easy to make and if you have made a cake or muffins, you can easily make waffles....all you need is a waffle maker and some basic ingredients. And please..don't let the bit-tad-long ingredient list scare you!


Buttermilk Waffles
{makes 8 waffles}

Ingredients:
2 cups flour
2 tablespoons sugar
2 teaspoons baking powder
1 teaspoon baking soda
1/2 teaspoon salt
2 cups buttermilk {regular milk will also work}
1/2 cup butter, melted
2 large eggs
orange zest {optional}
Orange sections for garnish
Citrus sauce {see below}

Directions:
1.  In a medium bowl, whisk together flour, sugar, baking powder, baking soda and salt. Set aside.
2. In large bowl, whisk together buttermilk, melted butter, eggs and orange zest.
3. Add flour mixture to buttermilk mixture. Stir gently until batter is just combined. There will still be some lumps.
4. Plug in wafflemaker while the batter rests for a minute. When the waffle iron is ready, add a half cup of batter to the centre of the waffle maker. Remove when waffle is cooked...2-3 minutes.

Citrus Sauce

Ingredients:
2 cups orange juice, fresh squeezed or carton
1 cup sugar
1/2 teaspoon salt
1 tablespoon orange zest
1 tablespoon cornstarch
1/4 cup cold water

Directions:
1. Add orange juice, sugar, zest and salt to a saucepan. Bring to a gentle boil.
2. Mix cornstarch with cold water in a container. Shake vigourosly and pour into orange juice.
3. Let orange juice return to a boil while whisking.
4. When orange juice has thickened slighty, remove from heat and let cool.
5. Serve warm over waffles, with orange sections if desired.

The lovely folks at Canadian Tire  recently sent me a Cuisinart Waffle Maker, a product that can be found in the Canadian Tire Destination Home Guide,  to try and I had such a blast making these Buttermilk waffles with it.  I found it  was  a dream to use and any busy homemaker would love its features. Once plugged in, a small red indicator light will show during the pre-heat stage, and when the waffle maker is ready for batter, the light will turn green. While the waffle is cooking, the light will be red, and when the waffle is comletely cooked, the indicator light will turn to green again.  I was able to wash some dishes in the sink while the waffles were cooking because I could easily keep an eye on the light while waiting for it to turn green. The red/green light system takes the guess work out of when the waffles are ready, and is perfect  if you are new to the whole business of waffle making. I also had my 12 year old son help me with the waffles while I worked on some laundry. I told him that when the light turned green, he could take the waffle out and put some more batter in. Easy peasy.
Another wonderful thing about the Cuisinart Waffle Maker is that it has a small lever that can be adjusted {like a toaters} so you can choose how brown you would like your waffle to be. This is an awesome feature because my kids like their waffles golden brown, while my husband likes his waffles to be a bit darker and crunchy. The lever allows me to give my family the waffle that they want!
 And if you are worried about how hard a waffle maker is to clean, let me share with you that this waffle maker is a breeze to clean. This is what it looked like after I made 8 waffles and you can see that I only need to wipe it out and put it away. It's also small, and doesn't take up a ton of room for storage.
 My daughter loved the citrus-kissed waffles I made for her. In fact, everyone liked them and there were no leftovers. The only bad part? I couldn't get anyone to agree to have their picture taken while eating their waffles because the time change this week has everyone extra tired! But that's okay because the real reward for me was in making my family one of their favourites and having them gobble it up in no time! As they say...the proof is in the pudding...or, er...waffles in this case.

If you have never made waffles before, I really encourage you to try. It may seem like a lot of work at first...but it really is not. And after a few times, waffle-making will become  just like a super cool trick you can do in your kitchen!

Wishing you a wonderful spring break!

{This post was generously sponsored by Canadian Tire, but the opinions and images are my own. For more information, visit the Canadian Tire Destination Home Guide.}



This post is linked to:
Home Stories A to Z, Lolly Jane, Cozy Little House, Not Just A Housewife, Rae Gun Ramblings,

Friday, 16 November 2012

Delicious Homemade Grape Jelly in Just 10 Minutes...

Yes. It's totally true! You can have a batch of homemade grape jelly in just 10 minutes! Gone are the days when making grape jelly meant crushing grapes, straining through a cheesecloth and all that jazz. How is it so easy you ask? Welsh's Grape Juice on the shelf at your local grocery store....that's how! And this jelly is SO delicious and economical to make,,,with just 4 ingredients! This project is PERFECT if you are not a baker! All you need to be able to do here is read directions and stir!

Delicious Grape Jelly in Just 10 Minutes
{makes 4 cups}

Ingredients:
3.5 cups of sugar
2 cups unsweetened concorde grape juice, room temperature {I used Welsh's 100% Grape Juice off the shelf at my local Superstore.}
1/2 cup lemon juice
85 ml package of liquid pectin, preferably Certo
4- 1 cup sterilized mason jars with lids

Directions:
Bring sugar, grape juice and lemon juice to a boil in a medium size heavy-bottomed sauce pan. Boil for 7 minutes. Add liquid pectin and stir for 1 minute.Remove from heat. Skim off foam {if any}with a spoon. Pour jelly into mason jars. Let sit at room temperature for 24 hours or until jelly is set. Refrigerate for up to 1 month.

How easy is that? Now you have a tasty homemade gift to give for Christmas! The jars can be easily decorated with ribbon or baker's twine and a tag for a pretty looking present. You could even pair it with a can of refrigerated biscuits from the grocery store if you like. This is definitely my EASIEST homemade gift from the kitchen ever!

{This recipe comes from the August 2012 issue of Chatelaine Magazine...a  Canadian women's magazine that I love.}

{Thank you so much to Greenmunch for providing me with the red baker's twine used in this project! You really must go see their super PRETTY Christmas paper straws, baker's twine and treat bags. You will love them for all your Christmas projects.}


This post is linked to these great parties:
Tatertots & Jello, Six Sisters' Stuff, Positively Splendid, I Heart Naptime, Craft-O-Maniac, Kitchen Fun with My 3 Sons, Cozy Little House, The DIY Dreamer, Lil Luna, Uncommon, Gingersnap Crafts, Clean & Scentsible,Chef in Training, Under the Table & Dreaming, Dixie N Dottie, Stone Gable, 36th Avenue. Frugal Girls, Tidy Mom, Craftberry Bush, Today's Creative Blog, Inside Bru Crew Life,  I Heart NaptimeNot Just A Housewife, Project Inspire, Aalderberry Hill, Between Naps on the Porch, Somewhat Simple,

Ask Anna

Thursday, 15 November 2012

Gingerbread Scones with White Chocolate & Cranberries

I know. I know. I am sharing another scone recipe, but this one is my absolute personal favourite!
I just love these SO much and everyone I have given them to has absolutely loved them too. It's the kind of recipe that every time I take a bite, I just close my eyes and think, "Darn! This is so good".
This is, by far, better than anything you could buy and for less than 30 minutes, you have 16 little scones that are just the bees knees. I am making 4 batches of these to package in 8 parcels for gifts for friends and neighbours.
Gingerbread Scones with White Chocolate & Cranberries
{Make 16 small scones}

Ingredients:
2 cups flour
3 tablespoons brown sugar
2 teaspoons baking powder
1/2 teaspoon baking soda
1/2 teaspoon salt
1 teaspoon ground ginger
1/2 teaspoon ground cinnamon
1/4 cup cold butter
1/3 cup molasses {I used Crosby's molasses}
1 egg yolk
1/4 cup milk
3/4 cup cranberries, fresh or frozen {I like using berries that are frozen because they don't get mashed up when they are mixed in.
3/4 white chocolate chunks or white chocolate chips {I used Bernard Callebaut white chocolate chunks bought in bulk at Superstore.}

For tops of scones:
3/4 cup white chocolate melting wafers, melted
1/2 cup finely chopped craisins


Directions:
1. Preheat oven to 400. In large bowl, combine flour, brown sugar, baking soda, salt, ginger and cinnamon. Cut in butter with 2 knives or pastry blender until mixture resembles coarse crumbs.
Stir in cranberries and white chocolate chunks.

2. In small bowl, whisk together molasses, milk and egg yolk until smooth.

3. Stir molasses mixture into flour mixture until just moistened. If mixture seems too dry, add a little more milk and mix gently.

4. Turn dough onto lightly floured surface. {Flour your hands too to avoid dough sticking}. Knead gently 6-8 times.

5. Divide dough in half. Pat each half into an approx. 7 inch circle. Using large, sharp knife, cut each circle into 8 wedges {like a pie}. Transfer wedges {a knife can be used as a spatula} to a large cookie sheet.

6. Bake for approx. 12 minutes or until scones are puffed up and edges are golden and toothpick comes out clean.

7. Let cool completely.  Drizzle with melted white chocolate using a teaspoon and sprinkle with finely chopped craisins to finish.

Now treat yourself and make a cup of tea or coffee and enjoy a delicious gingerbread scone! This scone recipe is my *VERY* favourite and I hope you love it and love sharing it too!

Please be sure to visit Day 1, Day 2, and Day 3 of "Gifts From The Kitchen" week! Tomorrow involves a gift which requies no baking and only takes 15 minutes to make!

If you would like to see some of my other scone recipes, check out here and here and here.


This post is linked up to these great parties:
The Frugal Girls, Craftberry Bush, Not Just A Housewife, Tidy Mom, Tatertots & Jello, Six Sisters' Stuff, Positively Splendid, I Heart Naptime, Craft-O-Maniac, Kitchen Fun with My 3 Sons,
Cozy Little House, Beauty and Bedlam, The DIY Dreamer, Lil Luna, Uncommon, Savy Southern Style, Gingersnap Crafts, Clean & Scentsible, Sweet Boutique, Someday Crafts, Chef in Training, Under the Table & Dreaming, Dixie N Dottie, 52 Mantels, Stone Gable, 36th Avenue,
Frugal Girls, Today's Creative Blog, Inside Bru Crew Life, 33 Shades of Green, Skip To My LouNot Just A Housewife, Project Inspire, Setting For Four, Aalderberry Hill, Between Naps on the Porch, Somewhat Simple,

Ask Anna

Tuesday, 6 November 2012

The Best & Easiest Waffles Ever...

I remember when I was a little girl that it was such a special treat when my Grandmother got out her waffle iron and made waffles.
I can still the remember the smell and taste of those waffles...so SO good!
I got my first waffle iron when I was in University...and I have made waffles many, many times.
And tried many recipes...recipes that came with the waffle irons...recipes from cookbooks.
And I can tell you that THIS recipe, from the Joy of Cooking Cookbook, is the BEST waffle recipe.
It is easy to mix up, smells heavenly and tastes delicious.
Crunchy on the outside and tender on the inside.
Even my mother took this recipe home with her on her last visit to my house.
 If you have never made waffles before, I really encourage you to give it a try!
It really is easier than you think....you just need a 2 bowls, a spatula and a waffle iron.
Waffle irons are very inexpensive these days....I picked up my latest waffle iron from the local drugstore for just $19.99.
And here's the secret to making almost any recipe....the more often you make it....the easier it becomes!
We have waffles usually for Sunday morning breakfast at our house.
And they don't last long.
 
The Best Waffles
{makes approx. 6-8 waffles}
 
Ingredients:
1 3/4 cup all purpose flour
1 tablespoon baking powder
1 tablespoon sugar
1/2 teaspoon salt
3 eggs
8 tablespoons butter, melted {If you don't use REAL butter, I cannot guarantee the taste of the waffles.}
1 1/2 cups milk {we use skim milk because that's what we drink.}
 
Directions:
Measure dry ingredients into a large bowl. Whisk together. Melt butter in microwave. In small bowl, mix together 3 eggs, milk and melted butter. Make well in center of dry ingredients and pour wet ingredients into well. Mix gently with spatula. Let batter rest for a few minutes to give the baking powder time to activate. {You will see bubbles form in the batter.}
 Preheat waffle iron. Using a measuring cup, pour a scant 1/2 cup of batter into the MIDDLE of  each waffle impression. Close waffle iron. It should 'steam' a lot at first...then the steaming should slow down. {This is the batter cooking,} After around 4 minutes, lift up iron and check your waffles. If you want them to brown more, continue cooking for another minute or 2.
 This is how my family likes waffles.....not too brown.
Continue making waffles until the batter is gone. Serve hot with your favourite syrup. Sometimes we have strawberries and whipped cream with our waffles, or blueberry sauce.
This recipe is also a little flexible...you can use 4 6 tablespoons of butter if you would like a lower fat waffle, or a little more butter if you would like crunchier waffles. But we like the recipe above!

And let me tell you, if you can pull off a mean homemade waffle, you will be the favourite Mom on the block. My daughter's friends regularly request homemade waffles at our house when sleeping over!

Do you make homemade waffles?
If not, will you try after this post?


This post is linked to these great parties:
Wow Us Wednesdays, Wow Me Wednesday, Uncommon, Lil Luna, Clean & Scentsible,
Stone Gable, Tidy Mom, Craftberry Bush, Tatertots & Jello , Six Sisters' Stuff, Bru Crew Life,
Today's Creative Blog, Homestories A to Z, The 36th Avenue, The Frugal Girls, Under the Table & Dreaming,

Thursday, 5 July 2012

Luscious Lemon Chip & Sweet Cranberry Scones

Now that the kids are home for summer vacation and our mornings are not so rushed, it is nice to make them a special treat for breakfast.
 I call it "LOVE FROM THE OVEN".
One of our favourites are SCONES...made with buttermilk & so soft & tender.
Today I am sharing a  NEW recipe..... made with a new-to-me-product...lemon baking chips.... the results....these  wonderful & amazing lemon chip & sweet cranberry scones.
To be honest, I had never heard of LEMON CHIPS until I was browsing the aisles of the Bulk Barn last week  and found them among the chocolate chips.
I didn't know what I was going to do with them, but they looked & smelled SO good...I decided that they had to come home with me!
 Once I got home, I thought about all the lemon combinations we like....
Raspberry & lemon.
Blueberry & lemon.
Cranberry & lemon.
All gorgeous flavour combinations, but I decided to go with Cranberry & Lemon because that is what we had in the freezer at the moment.
I used my Mother's buttermilk biscuit recipe, which is easily adapted into a scone recipe by adding sugar and fruit.
There is NOTHING easier to make than a baking powder biscuit.
If you invest time into learning how to make biscuits, it will serve you a lifetime of a great side to add to a meal.
 For this recipe, you will need:
 2 cups flour
1 tablespoon baking powder
1/2 teaspoon baking soda
1 teaspoon salt
2-3 tablespoons sugar
1/2 cup cold butter
1 1/4 cups buttermilk
3/4 cup lemon chips
1 scant cup frozen cranberries {I like lots of berries. Use less if you don't!}
Sanding sugar {course sugar} {optional}

Directions: In mixing bowl, combine flour, baking powder, baking soda, salt, and sugar. Stir. Cut butter into cubes and add into flour mixture. Use pastry cutter or 2 forks to cut butter into flour mixture until it resembles course crumbs. Add lemon chips and cranberries and buttermilk. Stir with large spoon until soft dough forms.{If dough seems dry, add a little more buttermilk}. Turn onto floured surface {and flour your hands too!}and knead gently 7-8 times.


 Form dough into circle about the size of a dinner plate. Sprinkle with sanding sugar.
Cut into 8 wedges.
Place on cookie sheet or pizza pan.
Bake at 425 degrees for 12-14 minutes.
{Make sure you add scones to a HOT oven as this helps to activate the baking powder}
 Remove from oven when tops are slightly golden.
 Serve as a special breakfast treat, share with neighbours or enjoy with tea!
The lemon chips with the cranberries are perfectly divine tasting!
This biscuit recipe is so versatile.
If you leave out the sugar and fruit, it can be just a plain biscuit...perfect for strawberry shortcake.
Add a cup of shredded cheese and a teaspoon of garlic powder to the recipe and you have lovely cheesy biscuits to go with a soup or chowder.
Add a cup of shredded cheese and diced ham and you have a great brunch or lunch biscuit.

Have you tried LEMON CHIPS?
What did you make with them?


This post is linked to these terrific parties:


Chef In TrainingTip Junkie handmade projects UndertheTableandDreaming


I Heart Nap TimePositively SplendidIt's Overflowing


Funky Junk's Sat Nite SpecialSomewhat SimpleThe DIY Dreamer


Lil\'Luna


SixSistersStuff.com WhipperberryTidyMom


The 36th AVENUE
that give mcdonalds coupons and 
breakfast coupons you also can find recipe from