Showing posts with label recipe. Show all posts

Thursday, 10 July 2014

Salted Caramel Ice Cream Pops and 7 Other Amazing Cool Treats!

Follow on Bloglovin
When it's sweltering outside, there is nothing like a cool and frosty treat!
And I am crazy over salted caramel anything....it just melts my butter!
With a desire to create a frosty treat with salted caramel flavor, I used ice cream sandwiches as a base to make something both easy & delicious!
And they satisfy the craving for salted caramel ooey-gooey goodness!
I have also teamed up with some other amazing bloggers to bring you a collection of cool treats to enjoy when temperatures sky rocket!
Salted Caramel Ice Cream Sandwiches

You will need:
Ice cream sandwiches, but in half
Smuckers caramel sundae syrup
Skor Toffee Bits
Smoked salt {large salt crystals}
Lollipop sticks or Popsicle sticks

To make:
1. Place ice cream sandwiches on a waxed paper lined cookie sheet. Insert lollipop sticks.
2. Drizzle with caramel sundae syrup.
3. Sprinkle with Skor Toffee Bits and salt.
4. Place tray of ice cream sandwiches in the freezer to freeze for about 20-30 minutes.
5. Remove treats from freezer and wrap each treat individually in saran wrap. Place in freezer until serving time...if you can wait that long.

Here are some other delicious cool treats to enjoy!
From Left to Right they are:
Homemade Fudgesicles by Craftberry Bush


Wishing you a delicious day!


Follow on Bloglovin
This post is linked to:
Link Party Palooza, Tatertots and Jello,  It's Overflowing, Block Party, Monday Funday, The Scoop, Homestories A to Z, Time To SparkleInspiration GalleryI'm Lovin' It, Kitchen Fun With My 3 Sons, The Weekend Re-Treat The Party Bunch, 

Monday, 31 March 2014

Make Flower Lollipops for Spring

Follow on Bloglovin
I love colourful projects and these flower lollipops for Spring just make my heart happy! I first made these with my daughter 8 years ago when she was in Grade 4 and since then, they have always been one of my favourite things to make for Easter and Spring. And despite their pretty sculptured look, they are surprisingly simple to make with a few supplies.
I have made these with lollipops with kids and it's so fun to watch them experiment with colour. One year, my daughter and some of her friends even made some tie-dye looking flowers that were really cool. There are so many lovely colour choices for these simple lollipops, and the colours can be coordinated for any event. All that is needed is a few supplies that you can find at either at your local Michaels Store or Bulk Barn.
Flower Lollipops
Supplies:
Melting wafers in different colours
Lollipop mold {I got mine at the Bulk Barn for $3.69}
Paint Brushes for Food
Lollipop sticks
Directions:
1. Place melting wafers in small bowl and melt according to package directions. For painting flower centers, melt very small amounts at a time. Make sure lollipop mold is clean and dry.
2. Using paint brush, paint flowers centers with melted wafers. Let set for 10-15 minutes or until firm.
3. Once flower centers are 'set', melt another colour of wafers. Stir until smooth and then pour into mold...not quite filling it to make the flower.
4. Place lollipop stick in melted wafer as shown. 
5. Pour a little bit more melted wafer over top to hold it firmly into the lollipop. Let lollipops set for 20 minutes. {You can pop them into the freezer for a few mintues too}Then using fingers, gently pop flowers out of mold.
By using a few different colours, you should find yourself with a beautiful assortment of flowers to create a beautiful bouquet like the one I made below.
Add these little cuties to a pot with some paper grass for a pretty arrangement or centerpiece for a table. They are also a fun treat for Easter, a children's birthday party, bridal or baby shower.
These treats are so bright and colourful that they cannot help but add some happy cuteness to any occasion.
Thank you so much for visiting me!

Looking for more Easter ideas?
My Easter board on Pinterest is full of a ton of beautiful ideas. 
Please visit it HERE.


Follow on Bloglovin
This post is linked to:
The ScoopTatertots and Jello, Linky Party Palooza,Tidy Mom, Tip Me TuesdayGingersnap CraftsSavvy Southern Style, Show Me What You Got, One Project At A Time, Take A Look Tuesday, The DIY DreamerInspiration Gallery,  Kitchen Fun with My 3 Sons,  The Party Bunch,  Super Saturday, Our Sunday Best, That DIY Party, Monday FundayThe Sunday Soiree Party, The Block Party,  Home Stories A to Z,

Sunday, 30 March 2014

Veggie & Cheese Flatbread Wedges with Creamy Coconut & Pineapple Sauce #PataksMom

Follow on Bloglovin
With a a busy family, I often find it so helpful to have a few large size flatbreads in the freezer that can be quickly and easily turned into either appetizers, lunch or dinner. And with the help of different toppings and ingredients, a multitude of different flavours can be created. Recently when making a flatbread to serve as an appetizer, I decided it would be fun to mix in a little India and with the help of one of Patak's cooking sauces, I was able to create a flatbread with the wonderful layers of flavours of India, vegetables and cheese. And best of all....not only was it so tasty, but it only took 20 minutes from start to serving time.
We love flatbreads and pizza,but  we often like to skip the all too familiar tomato sauce and try something else as a sauce or base. This Patak's Creamy Coconut and Pineapple Cooking Sauce was the perfect trade up to a zippy flavor that we love with our food. Tasty and fragrant....it really added something wonderful  to these flatbread appetizer wedges.

Let's get to this easy appetizer recipe, shall we?
This recipe is really flexible because you can use whatever veggies and cheese you already have in your kitchen and that your family likes. And by using different veggies and cheese, you can create new flavours each time!
Veggie & Cheese Flatbread Wedges with Creamy Coconut & Pineapple Sauce

1 Flatbread
1/2 cup Creamy Coconut & Pineapple Sauce
1/2 Sour Cream
Chopped veggies {I used tomatoes, green onion, zucchini and red pepper}
Cheese of choice. I used both feta and mozzarella
Cilantro or Parsley, chopped

1. Heat oven to 350 degrees. Place flatbread on cookie sheet. Mix together sour cream and Creamy Coconut & Pineapple Sauce. Using spoon, spread coconut mixture over flatbread.
 2. Sprinkle flatbread with chopped veggies and cheese. Finish with sprinkling of chopped cilantro or parsley.
 3. Place flatbread in oven for 15 minutes or until heated through and cheese is melted. Remove from oven and cut into wedges.
This would make not only a wonderful appetizer, but a great lunch or dinner if served in larger slices too.

Part of my journey with Indian cooking has been learning more about the culture of India. Back in November, I visited an Indian restaurant for the first time and enjoyed an amazing meal full of new-to-me flavours. In January, my family enjoyed an Indian movie night where we watched Slumdog Millionaire and enjoyed these Crispy Curry Potato Skins with Mango Chutney.
And this month, I decided I would share with you my new knowledge of the practice of meditation, which has roots and origins in India. I started the practice of meditation to combat the stress of too many commitments that leave me feeling overwhelmed and jittery at times.
After searching for things that would help me to de-stress, I read a great book on Transcendental Meditation. This book teaches you how to meditate at home, which can help combat things like stress, anxiety, insomnia, high blood pressure and depression...to name a few benefits.
Transcendental Meditation uses the mind and voice or mantra to focus on a goal or feeling for a period of 15-20 minutes, twice a day, and with eyes closed, so that the mind can be cleared and a state of calm can be reached. An important component of mediation is slowing the breath.I find breathing so important because often I catch myself breathing too fast, which contributes to my feelings of stress. When a conscious effort is made to slow down breathing, it is possible to tap into the nervous system to reduce feelings of stress and anxiety.
The thing I have discovered about meditation is that not only does it work, but it can be done conveniently at home and does not require a big time commitment. Sometimes I find my schedule does not allow for a complete workout at the gym or a long walk.I find that meditation can fit in almost anytime. I just sit quietly by myself for 15-20 minutes and I can come away feeling refreshed and ready to tackle the rest of the day in a great mood!
Have you ever tried meditation? I highly recommend it!

Disclosure: I am part of the Patak's Ambassador Program with Mom Central Canada and receive special perks as part of my affiliation with this group. The opinions on this blog are my own.


Follow on Bloglovin
Tidy Mom, Tip Me TuesdayGingersnap CraftsBlock Party, The Sunday Showcase, Monday FundayShow Me What You GotOne Project At A TimeThe DIY Dreamer,  The Party Bunch,  Super Saturday, Our Sunday Best, That DIY Party, Monday FundayThe Block Party,  The Scoop,

Saturday, 29 March 2014

I am Guest Posting on Tatertots and Jello...

Follow on Bloglovin
I am so absolutely thrilled to be guest-posting on Tatertots and Jello this week! I have been reading TT&J for at least 6 years and I adore all of Jen's projects. She has recently been renovating a 1905 Cottage and it is fabulous! Hop on over and say 'hi' and check out my project of Bunny Mocktails, along with all of her amazing projects!
Wishing you an amazing weekend!
 

Follow on Bloglovin

Tuesday, 25 March 2014

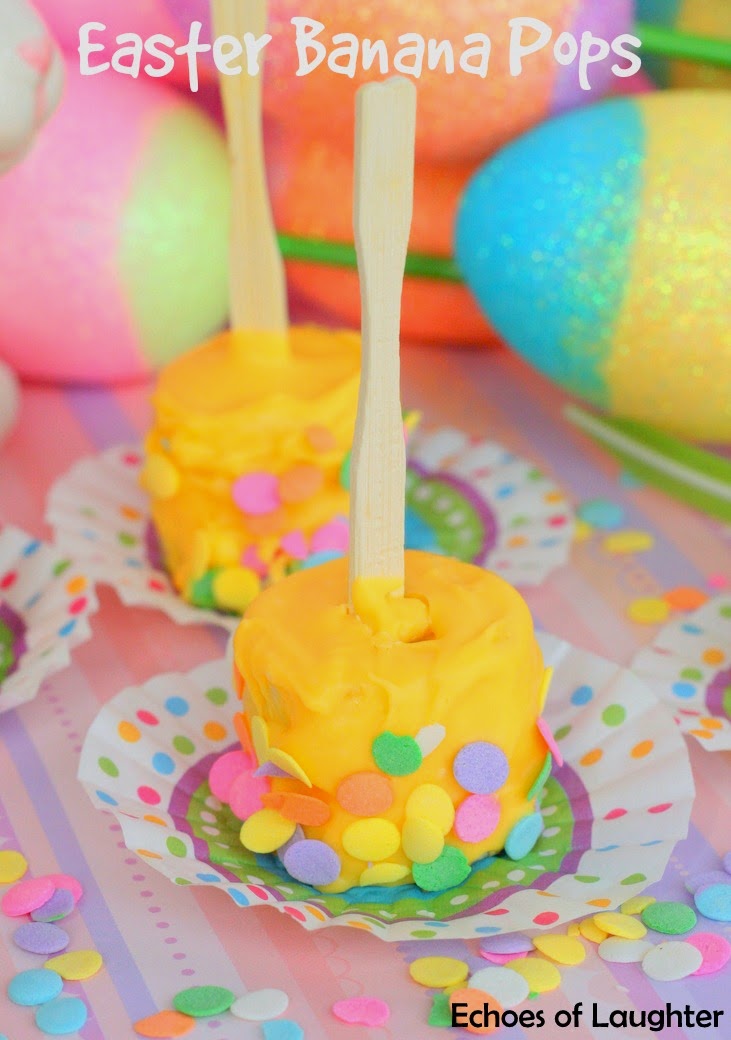
Easter Banana Pops

Follow on Bloglovin
Happy Spring!
 I hope you are well and that the snow will soon be leaving your neck of the woods! I love all of the pretty pastels and ice cream colours that Spring and Easter bring to our surroundings. It's so refreshing after a long winter. Since the Chocolate Pecan Bites were so popular at my house a few weeks ago, I just couldn't resist making these banana treats again and giving them a new 'outfit' for Spring. They look so pretty, while being the easiest thing in the world to make!

This is a great afternoon activity for little ones too. Bananas are very easy to cut...even with a plastic knife. I say this because when my daughter was little and she wanted to 'help' in the kitchen, I always gave her a plastic knife to cut with so I wouldn't have to worry about boo-boos on the fingers. And after cutting the bananas, the rest of the projects is just lickety-split easy.
To make Easter Banana Pops you will need:
Bananas, cut into thick slices
Wilton melting wafers in yellow, or your colour
Easter egg shaped sprinkles.
Small wooden picks or lollipop sticks

Step-By-Step Instructions:
1. Melt a small amount of wafers in bowl in microwave, following the directions on the package.
2. Dip end of wooden picks or lollipop sticks into melted wafer and then spear banana slice. {The melted water helps hold the banana on the stick}.
3. Chill bananas in freezer on a wax paper-lined cookie sheet for 10-15 minutes.
4. Melt a larger amount of wafers in a bowl. Then holding each banana slice over the melted wafers, use a spoon to drizzle the melted wafers over the banana completely. Then sprinkle sides of coated banana slices with sprinkles and place on wax paper-lined cookie sheet. Let set...about 10 minutes.
Now serve and enjoy! 
Kids will not only love making these, but love eating them too!

If you are looking for more fun Easter-inspired projects to make with kids, don't forget to check out  some of  the awesome recipes & ideas at Life Made Delicious!

Here are but a few of the fabulous ideas that you can find there:
Wishing you fun & much memory-making in the kitchen!

Disclosure: I am a part of the Life Made Delicious Blogger Program and I receive special perks as a part of my affiliation with this group. The opinions on this blog are my own.


Follow on Bloglovin
Linking up with:
Tatertots and Jello, Linky Party Palooza,Tidy Mom, Tip Me TuesdaySavvy Southern Style,Take A Look Tuesday, The Sunday Showcase,  Block Party,  Kitchen Fun With My 3 Sons, I`m Lovin` It, The Inspiration Gallery, Monday FundayShow Me What You GotOne Project At A TimeThe DIY DreamerGingersnap CraftsInspiration Gallery,   The Party Bunch,  Super Saturday, That DIY Party, Monday FundayThe Sunday Soiree Party, The ScoopHome Stories A to Z,

Friday, 21 March 2014

Chicken Clubhouse Bites on Skewers with Sriracha Mayo Dipping Sauce

Follow on Bloglovin
At my house, simple food rules when people are hungry and want something to eat fast. These yummy skewers are de-constructed clubhouse sandwiches with a delicious sriracha mayo dipping sauce that adds just enough spice  to perfectly marry the flavours of the chicken, ham, tomato and cheese.These bites can easily be made ahead of time and served as an afterschool snack or as an appetizer with frosty drinks. My son and husband love these and eat them almost as fast as I can make them. And sriracha mayo dipping sauce...oh my word! Have you tried this? It is so good with chicken, french fries, sushi and fish. My family loves sriracha sauce on a lot of different foods!
These are very easy to assemble and can be customized to include cubes of your favourite cheese.
And although you don't really need a recipe for these because the picture shows how it all goes together, a list of the ingredients is really helpful.

Chicken Clubhouse Skewers with Sriracha Mayo Dipping Sauce

Ingredients:
For the skewers:
Dill pickles, cut in chunks
Chicken breasts, cut into cubes
Cheddar Cheese, cut into cubes
Sliced ham, cut into pieces
Grape Tomatoes
Skewers

For the mayo:
1/2 cup mayo
1 tablespoon sriracha sauce

To make:
1. Thread chicken, tomatoes, ham, cheese and pickles on skewers as shown
2. To make the mayo, add sriracha sauce to mayo and mix until smooth. Serve with skewers for 
dipping.

Simple & delicious!
This is perfect to serve to a group of hungry teen boys.
Watch them dissapear!
Looking for more amazing chicken recipes?


Follow on Bloglovin
Linking up with:
Gingersnap Crafts Show Me What You Got,The Sunday Showcase,Take A Look Tuesday, Tuesday Talent Show, Time To Sparkle, Home Stories A to Z,  Kitchen Fun With My 3 Sons,,  I`m Lovin` It,  The Inspiration Gallery, Monday Funday,  One Project At A TimeTip Me Tuesday,  Super Saturday, The ScoopHome Stories A to Z,

Wednesday, 19 March 2014

Healthy Bunny Snack {Gluten Free, Nut Free & Dairy Free}

Follow on Bloglovin
How are you dear readers? I learned an important lesson this week. You see, I skipped meal planning on Sunday and well....that was SO not a good idea! I could not think of what to cook for dinner this evening and had to go through the freezer to frantically find something at the last minute.
 However, while I was bending over deep in the freezer, I did spy things that will make meals for the rest of the week.
Phew! Being frantic at dinner time is not a good thing!

When it comes to kids and snacks, it always nice if the snack can be both fun and healthy. When my kids were younger, I always liked to serve snacks that included fresh fruits and veggies, and even though my daughter is 17 now, fresh fruit is still her favourite snack of choice.
I created this snack with healthy ingredients in mind, as well as thinking about how it could be gluten free, nut free and dairy free too so it can be great for kids who cannot eat those things.
I think this bunny is both cute and delicious!
If you notice, the bunny ears are made of granny smith apples and they are a little brown. If you don't want the ears to turn brown, you can soak the apple slices in a mixture of lemon juice and water, I tend not to do this because my kids never liked the taste of apples soaked in lemon...they found it sour. So I never use this treatment to stop apples from turning brown.
 an
Healthy Bunny Snack

For this snack you will need:
Granny smith apples for ears and whiskers
Strawberries for nose and bow tie
Rice cakes for face
Cream cheese or vegan cream cheese for face
Green grapes for eyes
Raisins for eyes
Mango or nectarines for bow tie

To Create:
1. Spread cream cheese or vegan cream cheese on rice cake for face.
2. Cut green grapes into slices and add raisins on top to form bunny eyes. Place on face.
3. Slice granny smith apples into slices as shown for ears. Then cut thin julienne slices for bunny whiskers.
4. Cut strawberries into small triangle to make bunny nose. Then cut a small circle piece for bow tie.
5. Cut mango or nectarines into triangles to make bow tie.
6. Assemble bunnies as shown and serve.
I think this would also be a great activity for kids to assemble on their own.
Just provide the rice cake with the cream cheese already spread on and then supply the cut up fruit for kids to make their own bunny faces!

If you are looking for more cute kids activities for Easter, try these:

You can also find more cute idea on my Pinterest Board:

Wishing you a wonderful day!


Follow on Bloglovin
Linking up with:
Tip Me TuesdayOne Project At A TimeShow Me What You GotMonday Funday The Sunday ShowcaseBlock PartyI Gotta Create, Inspire Me Please, I'm Lovin' It, Kitchen Fun & Crafty Link Party,  Inspiration Gallery PartyTake A Look Tuesday, Tuesday Talent Show, Time To Sparkle, Home Stories A to Z,  Kitchen Fun With My 3 Sons I`m Lovin` It,  The Inspiration GalleryThe DIY DreamerGingersnap Crafts,  Super Saturday, That DIY Party, The Sunday Soiree Party, The ScoopHome Stories A to Z,
that give mcdonalds coupons and 
breakfast coupons you also can find recipe from