Showing posts with label easter. Show all posts

Thursday, 3 April 2014

Pretty Easter Wreath With DIY Ribbon Flowers

Follow on Bloglovin
Hello sweet readers!
Today I cannot wait to share this pretty pastel Easter wreath with you! 
I had so much fun making the DIY ribbon flowers and I love how it turned out.
Now if someone could just get rid of this snow!
I brought this Goodwill-find wicker wreath to life with these pretty DIY ribbon flowers that I made with ribbon from May Arts. I love using May Arts ribbon for my projects because they are such high quality ribbon in such beautiful patterns and colours!
And if you are intrigued to make your own ribbon flowers, let me show you how.
It is not hard at all!
First, you will need some pretty ribbon about 3 feet long and some floral wire.
1. Start by making a loop and securing it by tying some floral wire around the center. The loop size will determine the size of the flower, so start with a small loop for smaller flowers and larger loops for large flowers.
 2. Next, make another loop the same size as the first loop, so you have a cute little bow-tie like this.
 3. Next, make another loop coming from the center as shown.Wrap wire around the center to secure each loop as you make it.
 4. Next add a fourth and fifth loop, securing each loop in the center with wire.
Cut wire from the back when finished.
5. Using a hot glue gun, glue buttons in the center of the ribbon flowers as shown.
For this wreath, I made a large flower in pink, a medium-sized flower in purple and two smaller flowers in yellow. Then using a hot glue gun, I attached the DIY ribbon flowers to the wreath, along with some small Easter eggs and greenery I found at the dollar store.
I love making my own DIY ribbon flowers because I can make any size and colour to go with my project, and with the May Arts ribbon catalogue...they are so many fun ribbons to try!
Please visit the other amazing Easter projects created by the wonderful bloggers I've teamed up with this month!

From left to right, they are:

DIY Easter Photo Props by A Pretty Life in the Suburbs
Pastel Easter Wreathwith DIY Ribbon Flowers by Echoes of Laughter
Hope Wreath by Fynes Designs
Vibrant Easter Wreath by Time With Thea
Hippity Hop Wall Art by Clean and Scentsible
Pottery Barn InspiredEaster Bunny by Craftberry Bush
Ribbon Rosette Candy Jars by The Sweet Escape
Wood Slice Easter Wreath by The Happy Housie
Decorate Easter Eggs with Paint and Ribbon by The DIY Dreamer
An Easter Tablescape with Peat Pots by Satori Design for Living
Simple and Spring-y Easter Headbands by Suburble
An Upcycled Easter Basket by Northstory 


Thank you so much for visiting and I hope you find some fabulous inspiration for your Easter projects!

Follow on Bloglovin
This post is linked up with:
The ScoopTatertots and Jello, Linky Party Palooza, Tidy Mom,  Inspiration Gallery, Kitchen Fun with My 3 Sons, The Party Bunch, Super Saturday, Our Sunday Best, That DIY Party, Monday Funday, Sunday Soiree Party, The Block Party,  Home Stories A to Z,

Wednesday, 2 April 2014

Flowers & Chicks Easter Baskets {Craft}

Follow on Bloglovin
Hello sweet friends! 
If you visited me yesterday, you  know that I shared this tutorial on how you can easily make colourful & pretty flower lollipops for Spring
Today, I want to show a cute little craft project that can be created with a recycled yogurt container, flower lollipops, green paper grass and some cute dollar store chickadees...these adorable little Flowers & Chicks Easter Baskets.

Here are the supplies you will need and you know how I love to do things that are very budget friendly so most of these things can be picked up at the dollar store....with the exception of the flower lollipops that I shared how to make yesterday. But you could also buy some cute lollipops or suckers too if time doesn`t allow for lollipoping!
And you will also need some yogurt containers to paint to make the brightly coloured Easter baskets. Kids love painting things...so this little painting project is a great way to kick off the project. If you are pressed for time and don't think there will be time for kids to paint their containers, you could also pick up some small terra cotta pots at the dollar store. I have done this before and they work just as well and look just as cute. 
I know many of you will be able to tell just by looking at this project what you will need, but it is always good to have a list when you are shopping with children.

Flowers & Chicks Easter Baskets

Supplies:
Flower Lollipops {make or buy}
Floral foam
Green paper grass
School glue
Chickadees {or bunnies or eggs}
Yogurt Containers & paint & paint brushes ^

To Make:
1. Paint yogurt containers in bright colours.{Two coats are usually needed}. Let dry.
2. Cut floral foam with a knife to fit container.
3. Apply some school glue to the top of the floral foam and press some green grass onto foam to hide foam from showing.
4. Add lollipops by pressing sticks into floral foam so they stand up and look pretty.
5. Add a cute little chickadee, bunny or some cute small plastic Easter eggs to the basket.
These little chickadees are such a cute addition to these baskets. I love things made with pom-poms.
Here is a collection of the Flowers & Chicks Easter Baskets in a collection of different colours.
I think they are such an adorable craft project!
In years gone by, I used to make this craft with my daughter and a few of her friends. 
I loved seeing each individual project. Some girls would paint polka-dots or stripes on their pots.
If you are looking for more Easter crafts,  here are some of my other projects:

Thank you so much for visiting!

 
Follow on Bloglovin
This post is linked up:
The ScoopTatertots and Jello, Linky Party Palooza,Tidy Mom,  Inspiration Gallery,  Kitchen Fun with My 3 Sons,  The Party Bunch, Super SThe Block Party, aturday, Our Sunday Best, That DIY Party, Monday Funday, The Sunday Soiree Party, Home Stories A to Z,

Monday, 31 March 2014

Make Flower Lollipops for Spring

Follow on Bloglovin
I love colourful projects and these flower lollipops for Spring just make my heart happy! I first made these with my daughter 8 years ago when she was in Grade 4 and since then, they have always been one of my favourite things to make for Easter and Spring. And despite their pretty sculptured look, they are surprisingly simple to make with a few supplies.
I have made these with lollipops with kids and it's so fun to watch them experiment with colour. One year, my daughter and some of her friends even made some tie-dye looking flowers that were really cool. There are so many lovely colour choices for these simple lollipops, and the colours can be coordinated for any event. All that is needed is a few supplies that you can find at either at your local Michaels Store or Bulk Barn.
Flower Lollipops
Supplies:
Melting wafers in different colours
Lollipop mold {I got mine at the Bulk Barn for $3.69}
Paint Brushes for Food
Lollipop sticks
Directions:
1. Place melting wafers in small bowl and melt according to package directions. For painting flower centers, melt very small amounts at a time. Make sure lollipop mold is clean and dry.
2. Using paint brush, paint flowers centers with melted wafers. Let set for 10-15 minutes or until firm.
3. Once flower centers are 'set', melt another colour of wafers. Stir until smooth and then pour into mold...not quite filling it to make the flower.
4. Place lollipop stick in melted wafer as shown. 
5. Pour a little bit more melted wafer over top to hold it firmly into the lollipop. Let lollipops set for 20 minutes. {You can pop them into the freezer for a few mintues too}Then using fingers, gently pop flowers out of mold.
By using a few different colours, you should find yourself with a beautiful assortment of flowers to create a beautiful bouquet like the one I made below.
Add these little cuties to a pot with some paper grass for a pretty arrangement or centerpiece for a table. They are also a fun treat for Easter, a children's birthday party, bridal or baby shower.
These treats are so bright and colourful that they cannot help but add some happy cuteness to any occasion.
Thank you so much for visiting me!

Looking for more Easter ideas?
My Easter board on Pinterest is full of a ton of beautiful ideas. 
Please visit it HERE.


Follow on Bloglovin
This post is linked to:
The ScoopTatertots and Jello, Linky Party Palooza,Tidy Mom, Tip Me TuesdayGingersnap CraftsSavvy Southern Style, Show Me What You Got, One Project At A Time, Take A Look Tuesday, The DIY DreamerInspiration Gallery,  Kitchen Fun with My 3 Sons,  The Party Bunch,  Super Saturday, Our Sunday Best, That DIY Party, Monday FundayThe Sunday Soiree Party, The Block Party,  Home Stories A to Z,

Saturday, 29 March 2014

I am Guest Posting on Tatertots and Jello...

Follow on Bloglovin
I am so absolutely thrilled to be guest-posting on Tatertots and Jello this week! I have been reading TT&J for at least 6 years and I adore all of Jen's projects. She has recently been renovating a 1905 Cottage and it is fabulous! Hop on over and say 'hi' and check out my project of Bunny Mocktails, along with all of her amazing projects!
Wishing you an amazing weekend!
 

Follow on Bloglovin

Tuesday, 25 March 2014

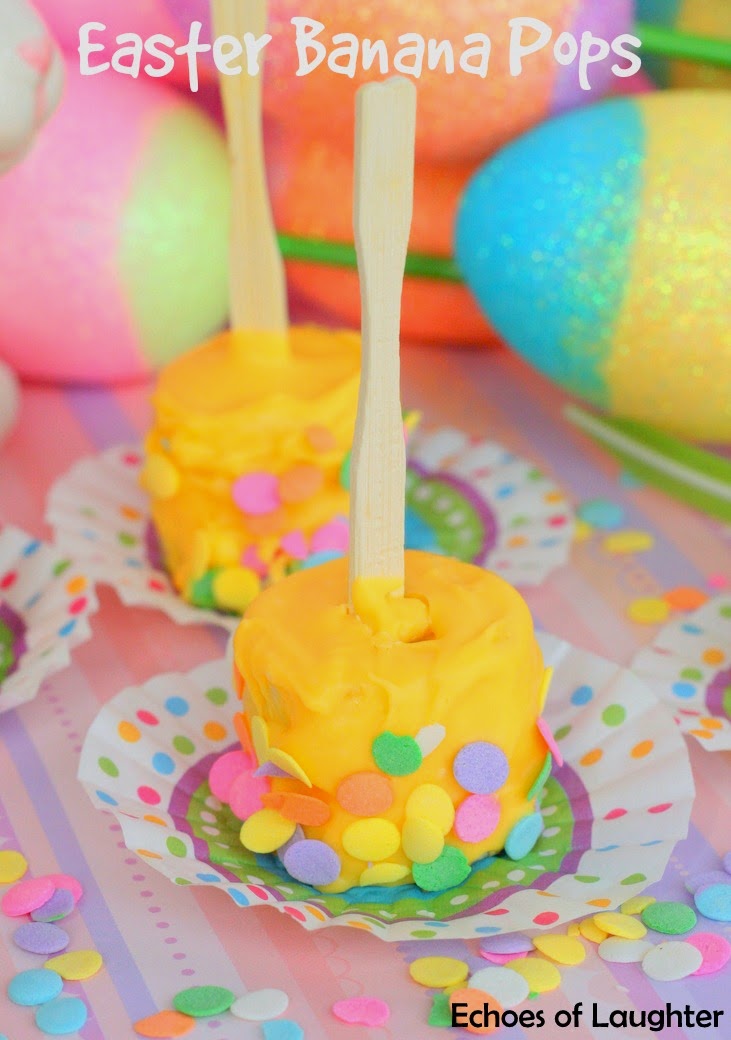
Easter Banana Pops

Follow on Bloglovin
Happy Spring!
 I hope you are well and that the snow will soon be leaving your neck of the woods! I love all of the pretty pastels and ice cream colours that Spring and Easter bring to our surroundings. It's so refreshing after a long winter. Since the Chocolate Pecan Bites were so popular at my house a few weeks ago, I just couldn't resist making these banana treats again and giving them a new 'outfit' for Spring. They look so pretty, while being the easiest thing in the world to make!

This is a great afternoon activity for little ones too. Bananas are very easy to cut...even with a plastic knife. I say this because when my daughter was little and she wanted to 'help' in the kitchen, I always gave her a plastic knife to cut with so I wouldn't have to worry about boo-boos on the fingers. And after cutting the bananas, the rest of the projects is just lickety-split easy.
To make Easter Banana Pops you will need:
Bananas, cut into thick slices
Wilton melting wafers in yellow, or your colour
Easter egg shaped sprinkles.
Small wooden picks or lollipop sticks

Step-By-Step Instructions:
1. Melt a small amount of wafers in bowl in microwave, following the directions on the package.
2. Dip end of wooden picks or lollipop sticks into melted wafer and then spear banana slice. {The melted water helps hold the banana on the stick}.
3. Chill bananas in freezer on a wax paper-lined cookie sheet for 10-15 minutes.
4. Melt a larger amount of wafers in a bowl. Then holding each banana slice over the melted wafers, use a spoon to drizzle the melted wafers over the banana completely. Then sprinkle sides of coated banana slices with sprinkles and place on wax paper-lined cookie sheet. Let set...about 10 minutes.
Now serve and enjoy! 
Kids will not only love making these, but love eating them too!

If you are looking for more fun Easter-inspired projects to make with kids, don't forget to check out  some of  the awesome recipes & ideas at Life Made Delicious!

Here are but a few of the fabulous ideas that you can find there:
Wishing you fun & much memory-making in the kitchen!

Disclosure: I am a part of the Life Made Delicious Blogger Program and I receive special perks as a part of my affiliation with this group. The opinions on this blog are my own.


Follow on Bloglovin
Linking up with:
Tatertots and Jello, Linky Party Palooza,Tidy Mom, Tip Me TuesdaySavvy Southern Style,Take A Look Tuesday, The Sunday Showcase,  Block Party,  Kitchen Fun With My 3 Sons, I`m Lovin` It, The Inspiration Gallery, Monday FundayShow Me What You GotOne Project At A TimeThe DIY DreamerGingersnap CraftsInspiration Gallery,   The Party Bunch,  Super Saturday, That DIY Party, Monday FundayThe Sunday Soiree Party, The ScoopHome Stories A to Z,
that give mcdonalds coupons and 
breakfast coupons you also can find recipe from