Showing posts with label free printables. Show all posts

Wednesday, 5 February 2014

Sweetheart Munchie Mix +Free Printable Tag

If you are looking for a quick and easy somethin' somethin' to make for a gift for Valentine's Day....I have just the thing for you...Sweetheart Munchie Mix.This mix is a delicious blend of sweet, salty, crunchy and chocolatey. It's heaven I tell ya! The best part...no baking skills required!
And I even created a cute little tag to go with it so that it's perfect for gift-giving!
This mix is so easy...it can be whipped together in under 10 minutes. You can also pop the popcorn or buy the popcorn...whatever you prefer.
Sweetheart Munchie Mix 

To Gather:
2-3 cups popcorn
2-3 cups Chex cereal
1 1/2 cup Smarties Valentine's Mix or other chocolate coated candy
1 1/2 cups melted milk chocolate {I use melting wafers from Bulk Barn because they are so easy to melt in the microwave and the chocolate tastes good.}

To Make:
1. Spread out popcorn and Chex cereal on a large cookie sheet.
2. Drizzle with melted chocolate. And go crazy if you like...the more the better in my book!
3. Sprinkle Smarties Valentine Mix all over the mixture. Let melted chocolate dry. Then break up mix, leaving chunks cause they are the yummiest to eat! 
And if you would love to bag this up for some sweethearts in your life, I have made a tag that can be printed off and attached to the Munchie Mix with a little ribbon.

 Sweetheart Munchie Mix Printable HERE.
This mix is my favourite. I cannot keep my fingers out of it. 
It even makes a very good dinner....not that I would do that or anything.
Just sayin'.

Thank you so much for visiting me!

Looking for more Valentine's ideas? Check out my Pinterest board here:

Sharing with: Inspire Me Please, I'm Lovin' It, Kitchen Fun & Crafty Friday Party, The Inspiration Gallery, The Party BunchTatertots and JelloLink Party PaloozaIt's OverflowingMonday Funday Linky Party, Craft-O-Maniac, Our Sunday Best, The ScoopOne Project At A TimeTake A Look Tuesday,  Tuesday Talent ShowTip Me TuesdayTime To Sparkle,  Wow Me Wednesday, The DIY Dreamer, Savvy Southern Style,

Tuesday, 4 February 2014

Easy Red Velvet Cookies For Valentine's Day

We loves cookies at our house and they disappear so fast! While browsing at the grocery store recently, I spied this brand new cookie dough.... Pillsbury Red Velvet Cookies. Sit down and shut the front door! I just had to take them home and try them out. They looked so pretty with white chocolate chips...with the taste of rich red velvet in a cookie form.

 The dough comes in a roll and just needs to be scooped out with a teaspoon and placed on a cookie sheet for easy baking. The package makes approximately 18 cookies.
And I couldn't help myself by making these red velvet cookies pretty by adding a few little things on top.
Easy Red Velvet Cookies For Valentine's Day

1 package Pillsbury Red Velvet Cookie Dough
3/4 cup pink melting wafers
1/4 cup Valentine's pareils 

To Make:
1. Bake cookies according to package directions. Let cool.
2. Melt pink wafers for 30-40 seconds, or until melted smooth.
3. Drizzle melted pink wafers over cookies. Sprinkle with pareils. Let dry.

Now hide some away before they all disappear! Or package them up to give to someone special.

These Red Velvet cookies are so pretty, and as a busy mom, I always like to have some ready-made cookie dough on hand. So the next time you are at the grocery store, don't forget to pick up a roll of these Red Velvet Cookies because they are only available for a limited time!

Looking for more Valentine's ideas? Check out my Pinterest board here:

Disclosure: I am a part of the Life Made Delicious Blogger Program and I receive special perks as a part of my affiliation with this group. The opinions on this blog are my own.


Sharing with: Tatertots and JelloLink Party Palooza,  Inspire Me Please, I'm Lovin' ItKitchen Fun & Crafty Friday PartyThe Inspiration Gallery, The Party BunchIt's OverflowingMonday Funday Linky Party, Craft-O-ManiacOur Sunday Best, The ScoopOne Project At A TimeTake A Look Tuesday, Tuesday Talent ShowTip Me TuesdayTime To Sparkle,  Wow Me Wednesday, The DIY Dreamer, Savvy Southern Style, Under  The Table & Dreaming,

Friday, 7 June 2013

Father's Day Printable Straw Flags, Tags & Bag Toppers

I am so excited because tomorrow we are hosting a Father's Day barbecue for some friends and we are barbecuing yummy food and playing some fun backyard games! I was busy today grocery shopping for the menu and doing other prep work when I felt inspired to create some super cool tags for our little party. I thought I would share them with you too,  so if you have plans for a Father's Day celebration, you will have some tags, straw flags and bag toppers for your gathering as well!

I created these little tags to attach to our cultery bundles. 
 And these straw flags for our drinks.
 I filled some plastic bags with some of my husband's favourite miniature chocolate bars and made toppers for the bags. 
Here you go! Enjoy!

Wishing you a wonderful weekend! 


This post is linked to :
Tatertots and Jello, It's Overflowing, What's Cooking With Ruthie, Aalderberry Hill, Uncommon Designs, Craft-O-Maniac, I Heart Naptime, A Pretty Little Life In The Suburbs, I Should Be Mopping The Floor,  Under The Table & Dreaming, Skip To My Lou, Lil Luna, Gingersnap Crafts, Clean & Scentsible,  The DIY Dreamer,Not Just A Housewife, I Gotta Create, StoneGable, The 36th Avenue,  Somewhat Simple, Craftberry Bush, The Frugal Girls, Becoming Martha, Whipperberry, 30 Handmade Days, 

Thursday, 6 June 2013

Dad's Commuter Kit

 I have to say that this a Fathers Day gift that is near & dear to my heart...a Dad`s Commuter Kit. My husband was a salesman on the road for many years and I worried about him every single day. I was always so happy when he arrived home at supper time...especially on days when winter roads were very dangerous.  I created this kit with the travelling Dad in mind...those Dads that are on the road for work, whether it be long drives to customers or to the office.

 I also created this cute tag to go with the kit, so you can print your own. 
I stuffed everything into a car organizer, but really any type of basket or plastic storage tote would work just as well.
Here is a list and picture of everything that I included in the kit for my husband.
Please note that this is not a roadside emergency kit. It's more of a 'care kit' for someone who spends a lot of time on the road or in their car and might often need some small things like bug spray for a golf tournament for work, or a lint roller for a suit jacket.
They are thoughtful things that a nice to have on-hand.
Here is the tag that can be printed for your own commuter kit. 
And if you would like to see more of my creative Father`s Day gifts, you can check out these ideas:

And my Father`s Day Pinterest Board HERE.


This post is linked to:
Tatertots & Jello, Link Party Palooza,Becoming Martha, The Frugal Girls, Design, Dining & Diapers, Whipperberry, 30 Handmade Days,  Tatertots & Jello, It's Overflowing, What's Cooking With Ruthie, Aalderberry Hill, Uncommon Designs, Craft-O-Maniac, I Heart Naptime, A Pretty Little Life In The Suburbs, I Should Be Mopping The Floor,  Under The Table & Dreaming,  Skip To My Lou, Lil Luna, Gingersnap Crafts,  Savvy Southern Style, Clean & Scentsible, The DIY Dreamer, Not Just A Housewife, I Gotta Create,  StoneGable, The 36th Avenue, Somewhat Simple, 30 Handmade Days,

Friday, 24 May 2013

Cashew Pretzel Hugs For Dad

It's no secret that we love our HUGS at this house...both the real kind and these special but-oh-so-easy homemade treats. Since my husband loves cashews, I thought I would put a bit of a different spin on regular pretzel hugs and replace the M&M candy with cashews. And they taste AH-mazing with the cashews. And I think that ANY nut would work just well...peanuts or almonds, for instance.

I have made many versions of pretzel hugs including a Valentine's version and an Easter version, in addition to the Christmas version. They are just such a wonderful gift and everyone likes them.
You can find the recipe HERE, but it's just pretzels with melted Hersheys hugs or candy melts and a candy pressed into the melted chocolate. {I got every thing I needed at Bulk Barn Canada}. It's a very easy project and great for kids to make!
I found the chevron patterned bucket in the dollar spot at Target and then I made some tags for you to print off so you can make re-create this package on your own.

You can see some of my other Father's Day gift ideas here, here and here.

And to check out more ideas, visit these boards on Pinterest:


This post in linked to these parties:
Whipperberry, Tatertots and Jello, Cooking With Ruthie, It's Overflowing, I Heart Naptime, I Should Be Mopping The Floor, Uncommon Design, Aalderberry Hill, Craft-O-Maniac, Made By You Monday, The 36th AvenueToday's Creative Blog, Sugarbee Crafts, Chef-In-Training, Time To Sparkle, Home Stories A to Z, The DIY Dreamer,  Gingersnap Crafts, Clean & Scentsible, Savvy Southern Style, Lil Luna, I Gotta Create, StoneGable, Somewhat Simple, Kitchen Fun With My 3 Sons,  Design, Dining &  30 Handmade Days, A Pretty Little Life in the Suburbs, Under The Table & Dreaming, Not Just A Housewife, 

Tuesday, 21 May 2013

Easy Homeade Peanut Brittle For Father's Day {Gift Idea}

Before I share this post about how to make easy peanut brittle in the microwave,  I have to say that while I was working in the kitchen today, I was also watching the news about Oklahoma and my heart just breaks for all those people. I am feeling very grateful tonight for my family, a roof over my head, food and a warm bed to sleep in.
This recipe comes from my Aunt Nannette, who is my mother's youngest sister, and an amazing cook like all of my mother's siblings. She shared this recipe with us about 10 years ago and I often make it for Christmas and my husband loves it. So I thought I would make some for him for Father's Day and share with y'all just how easy it is to make. Plus....as a bonus it is GLUTEN FREE!

This recipe is surprisingly simple and only takes 4 ingredients, and a few minutes in the microwave.

Easy Homemade Peanut Brittle
{Please note: My microwave is 800 watts. You may have to adjust the cooking slightly based on your microwave's wattage.}

Ingredients
1 cup white sugar
1/2 cup white corn syrup
1-1/2 cup peanuts
1-1/2 teaspoons baking soda

Directions:
1.Grease a cookie sheet.  In a glass bowl, mix together white sugar, corn syrup and peanuts.
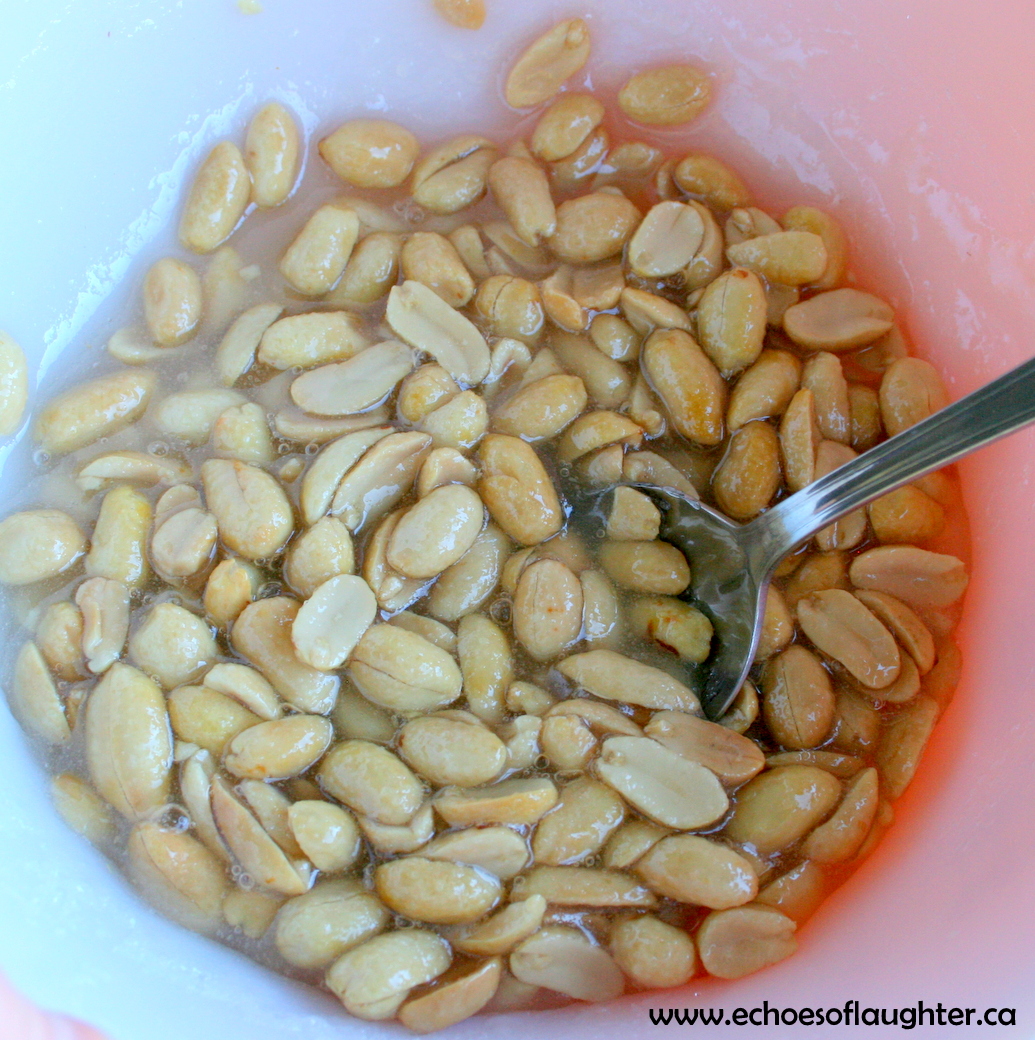
2. Place in microwave for 3 minutes on high. Then take it out and give it a quick stir. It will look like this:
3. Place back  in microwave for another 3-4 minutes. Remove very carefully as the sugar mixture will be extremely hot.
4. Add baking soda into peanut/sugar mixture and stir. The mixture will foam up and look like this.
5. Working quickly and being careful not to burn yourself, pour mixture onto greased cookie sheet and spread. {If you are having trouble spreading the mixture, my Aunt Nannette recommends using a wet spoon to help with the stickiness.}
6.Let peanut brittle cool  and harden for several hours and then break into pieces. {I would not recommend eating this until it is fully cooled...unless you would like to lose an old filling!}This recipe makes enough for  a gift bag as shown.
And because I love making tags for packages and sharing with my readers, here is a tag to use for the peanut brittle for a Father's Day gift.
This would make a great gift along with some tickets to a baseball or football game of Dad's favourite team.

Who knew that homemade peanut brittle was so easy?!

You can see a few more of my father's day gift ideas here and here and have a peek at my Father's Day Board on Pinterest .


This post is linked to these parties:
The 36th Avenue, I Gotta Create, StoneGable, Somewhat Simple, Kitchen Fun with My 3 Sons,The Frugal Girls, Design, Dining & Diapers, Becoming Martha, Whipperberry, Tatertots and Jello, Cookie With Ruthie, It's Overflowing, I Heart Naptime, I Should Be Mopping The Floor, Uncommon Designs,  Aalderberry Hill, Craft-O-Maniac, Skip To My Lou, Sugarbee Crafts, Chef-In-Training, Time To Sparkle, Home Stories A to Z, The DIY Dreamer, Gingersnap Crafts, Clean & Scentsible, Lil Luna, The 36th Avenue, Under The Table & Dreaming, 30 Handmade Days,  A Pretty Little Life In the Suburbs, Not Just A Housewife,

Sunday, 19 May 2013

Italian Pasta Salad Picnic Lunch

{To celebrate Summer as part of a sponsored post for Collective Bias, I made this Italian Pasta Salad from ingredients found at the Bulk Barn Canada. #cbias}

Summer is here! And that means it's the season for one of my very favorite summer activities...picnics. Our family loves taking picnic lunches to the park,  beach or outdoor concerts & events, so I created this cool & fresh  Italian pasta salad that is a great travel trooper and will satisfy any appetite on a hot summer day.

The inspiration for this recipe came when I was browsing the aisles of Bulk Barn and I happened to see  some sun-dried tomatoes. When I opened up the bin, they smelled so good that I knew that I had to make something with them.  As I browsed the rest of the aisles, the ingredients for the rest of the salad began to take shape as I picked up some penne pasta, pine nuts, and Italian spice, among lots of other things for upcoming baking projects and Father's Day items.
If you read a few of the recipes that I shared last summer,  you might remember that our family is not a fan of gloppy, runny mayo-based salads. We like salads that hold up well with ingredients that don't become drown in runny dressings, so many of my salad recipes included olive oil, along with other seasonings, as the dressing to keep everything together.  This salad includes not only penne pasta, pine nuts, sun-roasted tomatoes and Italian spice, but also some crunchy vegetables and spicy meat that makes it satisfying for a meal.

Italian Pasta Salad 
{serves 4 main meals or 8 side dishes}

Ingredients
8-10 cups cooked penne pasta, cooled
1/2 cup olive oil
1 tbsp. dijon mustard
1-1/2 tbsp. Italian seasoning
1-2 cloves minced garlic {optional}
1/2 cup sun dried tomatoes, diced
1/2 cup pine nuts
1/2 cup diced red pepper
1/2 cup diced green pepper
1/2 diced red onion
4 oz. diced sopressata salami
salt & pepper to taste

Directions:
1. In large bowl, add cooked penne pasta and olive oil, dijon mustard, Italian spice garlic. Mix until pasta is coated in a light layer of olive oil. This gives it flavor, but also prevents the pasta from sticking.
2. Add pine nuts, sun-dried tomatoes, diced red & green pepper, onion and salami. Mix until combined. Serve or refrigerate until serving time.
And now we stir it all together. This salad is perfect for a family dinner or a summer potluck.
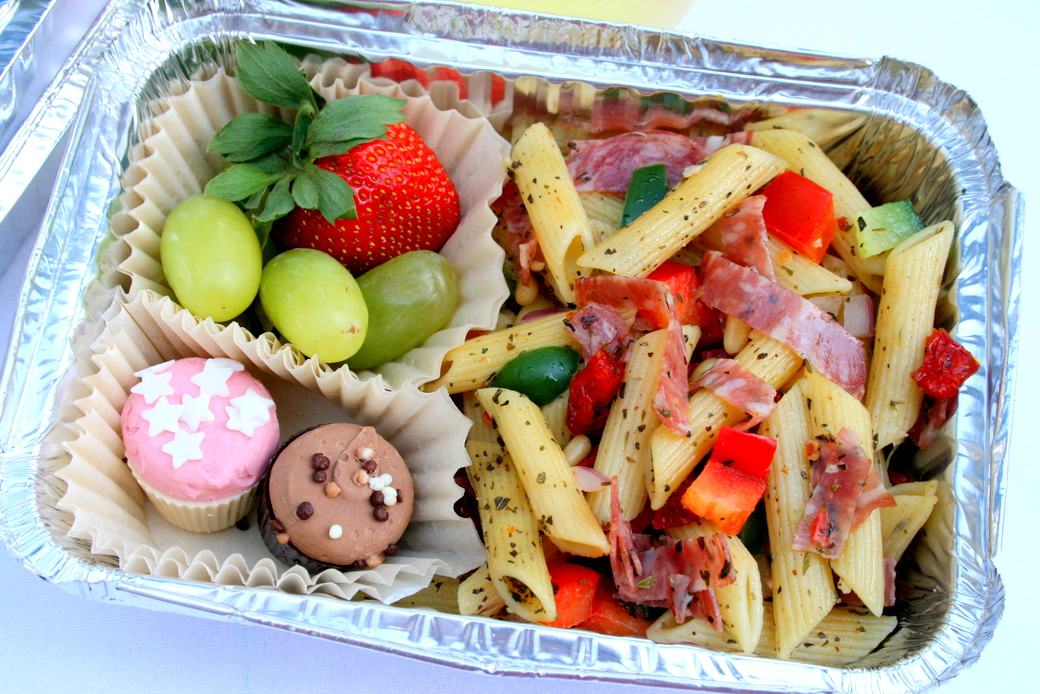
And because you know how I love pretty, I want to share with you how I made this Italian pasta salad into a lovely little picnic lunch by placing it in a small foil container and adding a little fresh fruit and some small chocolates to make a perfectly packaged lunch for one.
 And then I thought that it needed a pretty tag, so I created this colorful tag to share with you. These packaged picnic lunches would be perfect for a gathering of friends for an outdoor concert, a birthday party or just because you want to make a picnic lunch special.

So, the next time you are looking for a cool & refreshing summer salad that you can put together in under 30 minutes, you may want to give this delicious Italian pasta salad a try!


This post is linked to these parties:
Craft-O-Maniac, Uncommon Designs, Aalderberry Hill, Under The Table & Dreaming, Skip To My Lou, Lil Luna, Gingersnap Crafts, The 36th Avenue, I Gotta Create, StoneGable, Somewhat Simple,Kitchen Fun With My 3 Sons, The Frugal Girls, Design, Dining & Diapers, Becoming Martha, Whipperberry, Tatertots and Jello, Cooking With Ruthie, It's Overflowing, I Heart Naptime, I Should Be Mopping The Floor,  Uncommon Designs, Aaldeberry Hill, Skip To My Lou, Cozy Little House, Sugarbee Crafts, Chef-In-Training, Time To Sparkle, Home Stories A To Z, The DIY Dreamer, Clean & Scentsible,  Not Just A Housewife,
that give mcdonalds coupons and 
breakfast coupons you also can find recipe from