Thursday 25 July 2013

Campfire Mexican Dip with Grenadine Lime Sippers

You know one of the great things I love about summer?
It's the season for dipping and sipping outside while enjoying some of the best weather of the year with family and friends!
And who doesn't like a little Mexican heat for dipping, along with a cool refreshing bevvie  to cool off the palate?
I can always count on Mexican flavors as a crowd favorite whenever serving a meal or snack to my family or friends. It's always received very well and disappears quickly!
And this easy dip made in a cast iron frying pan is perfect to serve when camping or in the backyard.
{I know that we always have our trusty cast iron frying pan with us when we camp...it's a must!}
And this dip is not too spicy so it is great for the kids and adults alike.
However, feel free to turn up the heat by adding chopped hot peppers if sizzling heat is more your style.
Easy Mexican Campfire Dip
{serves 6}

Ingredients:
1 brick cream cheese, softened
1/2 cup mayo or sour cream
1/2 cup salsa
1/2 cup chopped green onion
1 cup shredded cheddar cheese
1 tablespoon Tex Mex spice
1/2 cup diced red pepper
1/2 cup diced fresh avocado

Directions:
1. In large bowl, add cream cheese, mayo or sour cream, salsa, green onion, cheese and Tex Mex Spice.
2. With wooden spoon, whip everything together until mixed well. This is a good way to get the kids to help too.
 3. Spread in bottom of cast iron frying pan or large foil pan.
4. Place on grill-topped campfire or BBQ on high heat for about 15-20 minutes, or until dip is hot and bubbly. Remove from heat and sprinkle with chopped red pepper and avocado.
 5. Serve with tortilla chips, pita bread, crackers or veggies for dipping. Delish!
And as everyone is digging into the tasty dip, it will be time to mix together some refreshing sippers!
These sippers are easy to create camp-side, and are a different take on the usual.
 Grenadine Lime Sippers

Ingredients:
Sparkling water, soda water, 7-Up, or Sprite
Grenadine Syrup {found among drink mixes in the grocery store}
Limeade, thawed slightly {I used a can of concentrate from the frozen food section.}
Lime slices and cherries for garnish

Directions:
1. Fill each drinking glass with 1/3 ice.
2. Add sparkling water, soda water, 7-Up or Sprite to each glass leaving 2 inches from top to add grenadine syrup and limeade.
3. To each glass add a good splash of grenadine syrup and tablespoon of frozen limeade.
4. Garnish each glass with a cherry and slice of lemon and serve!

Looking for more delicious ideas for SUMMER dipping and sipping? Visit Life Made Delicious  for more inspiring ideas like these:


AND


Wishing you a wonderful day!


{Disclosure: I am a part of the Life Made Delicious Blogger Program and I receive special perks as part of my affiliation with this group. The opinions on this blog are my own.}


This post has been linked to:
Tatertots and Jello, Under The Table & Dreaming, Craft-O-Maniac, Aalderberry Hill, Monday Funday,  Chef-In-Training, Sugarbee Crafts, A Bowl Full of Lemons, Homestories A to Z, Time To Sparkle,  The 36th Avenue, Gingersnap Crafts, Tidy Mom, Kitchen Fun With My 3 Sons, The Frugal Girls,  The Inspiration Gallery, Whipperberry, Made By You Monday,  Savvy Southern Style, StoneGable Blog,

Tuesday 16 July 2013

Organizing For Entertaining With My Frigidaire Gallery French Door Fridge {With Video}

Hello sweet people!
I hope you are well this week and life is good!
If you may remember, recently, I had the honour of being chosen  as a Frigidaire Canada Ambassador as part of an amazing program offered through Mom Central Canada and Frigidaire Canada. I cannot tell you what a thrill it was to open that email a few weeks ago to learn that I had been chosen. It was one of the most thrilling days ever as a blogger!
In the first post about my new Frigidaire Gallery French Door Fridge {also dubbed The Queen of the Kitchen}, I shared how it helps keep my kitchen organized.
Today I am here to share how my Frigidaire Gallery French Door fridge helps me get ready for some summer entertaining.
One thing that I have learned over the last month in having my new fridge is that it is full of possibilities for storing food.....no matter what your needs are! I love how this fridge fits our lifestyle and does exactly what we need it to do! It has exceeded our every expectation in terms of space and performance and we couldn't be happier with our new 'Queen of the Kitchen'!

Instead of showing you a bunch of pictures this time around, I thought it would be fun to share a little  2 minute video explaining how I got ready for a hosting a summer  BBQ for friends on a Saturday night and how my fridge became my right hand girl! Are you ready?

The Frigidaire Gallery® French Door Fridge is made with busy moms and busy families in mind. I cannot tell you  how much I have enjoyed having the "Queen of The Kitchen" as a new partner in my kitchen activities. To be  able to go to the fridge and find food quickly and easily, and having ALL of the space I need to store fruits & vegetables, condiments, drinks, leftover dishes and food for ENTERTAINING is such a wonderful thing!
Thank you  so much for being here with me today and taking a peek at my very first video here at Echoes of Laughter!

If you would like to follow the conversation to see what other Frigidaire Canada Ambassadors are sharing about their new fridge, please feel free to follow us on Twitter at #tesdrivemoms!

{Disclosure:  I am part of the Frigidaire Canada Ambassador program with Mom Central Canada and I receive special perks as part of my affiliation with this group. The opinions on this blog are my own.} 


This post is linked to these parties:

Sunday 14 July 2013

18 Best Summer Desserts

Hello Sweet Readers! I hope you are enjoying great summer weather where you are!
I had a super busy week last week with returning from our camping trip and the arrival of some company for the week.
We had some amazing ribs from the bbq this weekend, and the most fantastic coconut cream pie for dessert...which brings me to summer desserts.
Let's just say that we all love them at our house and here are our favorites from the Echoes of Laughter archives.

Let's here it for the NO BAKING REQUIRED DESSERTS:
And here are some BAKED SUMMER FAVORITES:
And then the SUPER EASY CAMPING DESSERTS:
What is your favorite summer dessert? Is there something that you look forward to every summer?

Wishing you a wonderful Monday!


This post is linked to:
Under The Table & Dreaming, Sugarbee Crafts, Time To Sparkle, Under The Table & Dreaming, Tatertots and Jello, Chef-In-Training,

Monday 8 July 2013

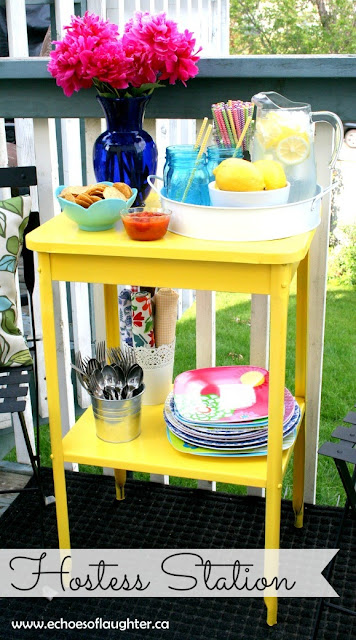
A Beautiful Hostess Station

Hello amazing people!
I hope you had a wonderful weekend! I want to share with you a project that I worked on this weekend...a hostess station. And this little project involved my most favourite kind of fun...taking an ugly flea market find and turning it into something both useful AND pretty.


Here is what I started with...a ratty, pretty unremarkable old metal stand that has been kicking around our house forever. I know we have had it since at least 1994 when we bought our first house and I vaguely remember giving it a quick coat of white paint way back then. And it has been used in a few rooms in our house, but it has spent the last 8 years in our basement storage area. Until I wanted  to make a hostess station on the back deck and then this caught my eye...dusty and forgotten but perfect for a new job!
Hello yellow spray paint! How I adore you.
Can you believe the difference?
A quick 2 coats of yellow paint and what a beauty.
I now have a beautiful hostess station for our back deck that cost only the price of a can of $6.97 paint. 
It is the perfect surface for drinks, snacks, dishes, cutlery and even some pretty flowers.
 On the second shelf is a collection of cutlery, my collection of mismatched melamine plates and mismatched cloth napkins. I love mismatched collections.
And the best part? You can add in a new piece and it fits in perfectly with all the other mismatched items.
 I took a recycled jar and added this fun chalkboard label to house my collection of colourful chevron straws.
 A water picture and my beautiful NEW blue mason jars complete the drink tray.
 I love my new hostess station...it is pretty and functional and it cost less than $8 to create.
How about you? 
Have you freshened up an old something-or-other recently with a can of spray paint?
What colour did you use?
Do tell...inquiring minds want to know.

To see some of my other projects for summer...check out these DIY Spray Painted Bucket Planters, Front Porch Makeover and this Deck Makeover.

And for more inspiration, please visit these boards on Pinterest:

{And a special thank you to the folks at Greenmunch for providing me with the beautiful chevron straws, chalkboard labels and blue mason jars to help make my hostess station so pretty!  Please visit their website for the latest in trendy party goods and eco-friendly products.}


This post is linked to:
The DIY Show OffMetaphorsis MondayA Bowl Full of Lemons, Sugar Bee Crafts, Chef In Training, Homestories A to Z, Time To Sparkle, Cozy Little House, Lil Luna,Gingersnap Crafts,Savvy Southern Style, Inspiration Exchange,The DIY Dreamer,  Not Just A Housewife, The 36th Avenue, I Gotta Create, StoneGable, Tatertots and Jello, Funky Junk Interiors,Six Sisters Stuff, A Pretty Life, It's Overflowing, I Heart Naptime, Under The Table & Dreaming, Craft-O-Maniac, Aalderberry Hill,  Uncommon Designs, I Heart Organizing, The Frugal Girls, The Inspiration Gallery, Whpperberry, Made By You Monday, Shabby Creek Cottage,

Friday 5 July 2013

Campfire Cheesecake Dip

Happy Friday sweet people!
July is camping month for our family and we so look forward to it....especially when we switch things up a bit and test drive a few recipe creations....like this Campfire Cheesecake Dip.
My daughter and I are crazy over fruit with dips, so I was inspired to re-imagine some of our fav desserts  into a dip version....like a cheesecake dip.
This dip could not be easier to make with just 4 ingredients dumped into tin foil squares and thrown onto a hot grill over a campfire or BBQ. And it tastes divine.

Campfire Cheesecake Dip

Ingredients:
  • 1 tub of Philadelphia Cream Cheese
  • 1 heaping tablespoon of brown sugar
  • handful of white chocolate chunks
  • handful of milk chocolate chunks
Directions:
1. In a square of tin foil, place tub of cream cheese. 
2. On top of cream cheese, add tablespoon of brown sugar, and white chocolate and milk chocolate chunks.
3. Wrap up into a tin foil packet, as shown below.
4. Place on grill over campfire or BBQ for approx. 15-20 minutes. Open up packet and stir with a spoon so that everything is mixed.
5. Open tin foil packet like a bowl and serve with fresh fruit!

Just to recap this very easy dip with pictures.
Here are the 4 ingredients:
Wrapped into a tin foil packet.
After 15-20 minutes of heat, give a stir with a spoon.
 Serve with fresh fruit.
Super delicious!
Looking for more easy meals & desserts in tin foil?


Have you tried any new camping recipes lately? What is your family's favourite?
Wishing you wonderful camping adventures this summer!


This post is linked to:
Liz Marie Blog.The Shabby Creek Cottage, Whipperberry, Craft-O-Maniac, Under The Table & Dreaming,  Uncommon Designs, Aalderberry Hill, A Pretty Life, A Bowl Full of Lemons, Sugar Bee Crafts,  Chef In Training, Homestories A to Z, Time To Sparkle, Lil Luna,Gingersnap Crafts, Inspiration Exchange, The DIY Dreamer, Not Just A Housewife, The 36th Avenue, I Gotta Create, StoneGable, Tatertots and Jello, Funky Junk Interiors, Six Sisters Stuff, It's Overflowing, I Heart Naptime,  Aalderberry Hill, Sugarbee Crafts,
that give mcdonalds coupons and 
breakfast coupons you also can find recipe from