Tuesday, 30 October 2012

Jello Jar Monsters...

How 'bout these cute little critters?
These are so easy that you could whip them up just in time for an afterschool snack or dessert for tomorrow.
 And when I tell you they are simple...they really are simple. You have the option of making your own jello in jars OR you could buy the jello snack cups at the grocery store to make it even easier!

All you need:
Small 250 ml mason jars
orange jello
candy eyes
assorted gummy candies for making hair and nose and fun!

Directions: Mix jello according to package directions and pour into jars. When jello is set, add faces just before serving.
This could also be such a fun activity for kids...just give them the jello jars and candies and let them decorate away!

Happy Halloween!


This post is linked to these great parties: DIY Dreamer, Clean & Scentsible, Uncommon, Homemade Ginger, Lil Luna, Savy Southern Style, Gingersnap Crafts, 33 Shades of Green,
Positively Splendid, I Heart Naptime, Craft O Maniac Monday, Something I Whipped Up,
Today's Creative Blog, Homestories A to Z, Wow Us Wednesdays, Tidy MomCraftberry Bush,
Tatertots and Jello, Six Sisters' Stuff, Moms & Munchkins, Sugarbee Crafts,

Monday, 29 October 2012

Getting Ready For Cold & Flu Season...

Today I want to share with you a seasonal organizing project which is especially important for this time of year...cold & flu organizing. Let's face it...there is nothing worse than needing fever medicine for a sick child at 3 am and discovering that the bottle is almost empty. It's happened to me before and I've been left driving around town in my pajamas and bad hair looking for the 24 hour drug store. Surely not a fun chore to do at 3 am, so I got my act together and I have been organized and ready for the cold & flu season for the past few years.

Now is the perfect time to go through the medicine cabinet or cupboard to take stock of the cold & flu supplies to make a list of things needing replacing/replenishing  for winter. I would suggest gathering everything together and checking 'best before' dates and discarding those medicines which have expired.   Now you are ready to make a list of items you need to pick on the next trip to the store.

One thing that I like to use to organize our cold & flu supplies is a handy dandy carry-all. I found this one at the dollar store and I love it because it holds everything that might be needed for a sick patient and is easy to carry to whichever room its needed. Or, when you have more than one family member sick, it's great for running from room to room without losing your mind! I call our handy carry-all "The Nurse".


"The Nurse" is stocked with:
  • Fever medicine. Liquid medicine for my youngest child and tablets for everyone else.
  • Gravol. Both liquid and tablets.
  • Vicks Vapor Rub
  • Sinus/Decongestents
  • Thermometer
  • Tea
  • Honey Sticks
  • Throat Lozenges
  • Tissues
  • small pad of paper and pen for recording doses of medicine and times given {because when you are sleep-deprived, it can be hard to remember,}

The only thing not in "The Nurse" is ginger ale, Gatorade, saltine crackers, chicken noodle soup and popsicles. I used to buy a case of ginger ale for the winter, but this past summer we got a Soda Stream and I love it because we can make ginger ale anytime that it is needed. I have stocked up with a couple of boxes of saltine crackers and a case of chicken noodle soup. If you have little children in the house, a supply of Pedialyte would be a good thing to have as well.

This organizing project should take no more than 15 minutes {not include shopping time}, but you will be so happy with yourself for being prepared for whatever comes your way this fall & winter.There will be no driving around town in pajamas and bad hair at 3 am...which is always a good thing!

{This post was written for a guest post for I'm An Organizing Junkie and was shared there last week.}


This post is linked to: Tuesday Talent Show, Home Stories A to Z, DIY Dreamer, Clean & Scentsible, Uncommon, Homemade Ginger, Lil Luna Savy Southern Style, Gingersnap Crafts,
Positively Splendid, I Heart NaptimeCraft O Maniac MondaySomething I Whipped Up,
Today's Creative Blog, Stone Gable, Tidy Mom, Craftberry Bush, Tatertots and Jello, Six Sisters' Stuff,

Wednesday, 24 October 2012

A New Beverage Center....

It's hot chocolate weather here.
And that led me to do some organizing around these parts because my kitchen counter space was getting eaten up by machines....machines that spit out hot choc and lattes.
And I wish we could narrow it down to just one....but we really like both...for different reasons.
So I started considering other options.
I have a very small kitchen and  I began thinking that a buying some kind of storage piece with ample counter space along a wall would do the job nicely.
Although I looked at several options at IKEA...they were either too long or too short for the space I needed.
On a recent trip to Homesense, I found this white cabinet and I loved the size and shape, but it was too short. Then I realized if I bought two and placed them side by side, they would provide the space and storage I needed for two machines.
{Ideally, the best solution would be a built in of some kind,but that is not in the budget.}
I love the glass doors on the front because they keep the dust away.
And the inside of the cabinets furnish great space for my  fav cookbooks{currently stored inside the pantry} and some of my white dishes.

 There is lots of space for all the hot drink fixings on the top...syrups, honey, sprinkles, spoons, etc.
 I may try to add a piece of trim to fill in the gap between the 2 cabinets to make them look like one unit. Otherwise, these cabinets are the perfect solution for creating a beverage center, while keeping everyone out of the main work area of the kitchen.
This makes for a win-win in my books.
I like to have the appliances we use everyday to be easily accessible and pretty.
And this sure is cheaper than a new kitchen...or a new house!
 
How about you? Has winter brought about any changes in your house?


This post has been linked to these parties: Weekend Wrap Up At Tatertots & Jello, Tuesday Talent Show at Chef-in-Training, Home Stories A To Z, The DIY Dreamer, Clean & Scentsible, Uncommon, Homemade Ginger, Lil Luna, Savy Southern Style, Gingersnap Crafts, Positively Splendid,   I Heart Naptime Something I Whipped Up, Today's Creative Blog, Stone Gable,
Tidy Mom, Craftberry Bush, Six Sisters' Stuff,

Monday, 22 October 2012

In The Slowcooker: Cheesy Chicken Tater Casserole

 
With winter weather coming on now...I am on the hunt for some tasty new slow cooker meals to serve my family on chilly nights.  Last week I was reading my friend Gina's blog when I saw that she has posted a link to a recipe that was on her meal plan....Cheesy Chicken Tatertot Casserole. I was intrigued...plus it had 4 main ingredients that most families like...chicken, cheese, bacon & tatertots. Sounds good, right?

I made it for my family and everybody liked it and it disappeared fast. And I even heard, "What smells so good?" as people came through the door....that is always a good sign! Although the original recipe was for a very basic cheese, chicken, tatertot & bacon mixture, I also added in sliced mushrooms, green onion and leeks to add some veggie to the dish and also because I know my family likes those veggies.

So here we go...

Ingredients:
4 chicken breasts, cut in bite size pieces
1 large bag of tatertots
2-3 cups of shredded cheese {I used a bag of Mexican cheese mix}
6 slices of bacon, cooked and crumbled
3/4 cup of  milk
Optional:
1 cup diced green onion
2 cups of sliced mushrooms
1 leek, sliced {white & light green parts only}

Directions:
1. Spray casserole dish with cooking spray.
2. Pour into half of tatertots. Sprinkle half mushrooms, leeks, green onions, bacon and cheese.
3. Layer chicken over veggies, bacon and cheese. Season with salt and pepper.
4. Add remaining tatertots, mushrooms, leeks and cheese. Sprinkle with remaining bacon and green onion. Pour 3/4 cup milk over casserole. {Don't worry if casserole comes right to the top of the dish...it shrinks down while cooking.}
5. Cover casserole and cook on high for 3-4 hours, or on low for 6-7 hours.


I served this yummy casserole with carrots and a salad...and everyone left the table with happy tummies!  Thank you so much for the inspiration Gina!

This dish would be awesome to make up the night before and cook in the slowcooker on a work day to come home to at suppertime. Or to throw in on a busy Saturday or Sunday when you are away for the day with the kids' activities like hockey, football, soccer, etc.

Don't you love when you a try a new recipe and it goes over well? {Trust me...I have had my share of recipe fails too!}

What is your family's crockpot/slowcooker meal?

Here is another of our other favourite slowcooker meals:


Tuesday, 16 October 2012

A Spooky Snack...

Today I want to share with you a cute little spooky snack that I used to make when my kids were younger.
It is super easy...no baking required!
 This little snack is also mostly candy free..which is a bonus for a candy-laden holiday such as Halloween.
It's a satsuma orange with a pumpkin face made with a sharpie, a little spider made with ritz crackers, pretzels, peanut butter {you could also use cream cheese} and candy eyes from Wilton.
 And the drink is a orange punch with a gummy spider on a orange striped straw.
{The orange striped straws came from Greenmunch and you can find there here.}
Super easy, cute and fun for kids!
Do you make any special snacks/treats for your kids at Halloween?


Positively SplendidI Heart Nap Time

Funky Junk's Sat Nite SpecialIt's Overflowing

UndertheTableandDreaming The DIY Dreamer


Lil\'Luna

Home Stories A2ZChef In Training


Monday, 15 October 2012

Salted Caramel Chocolate Cheesecake & Win Groceries For A Year!


Hello everyone!
I am so glad to be back to share this delicious recipe for Salted Caramel Chocolate Cheesecake with you!
It doesn't take a lot of time to make...about 20 minutes of preparation and 40 minutes of baking time, and it features one of this home's favourite ingredients...Philadelphia Cream Cheese.
Delish! 

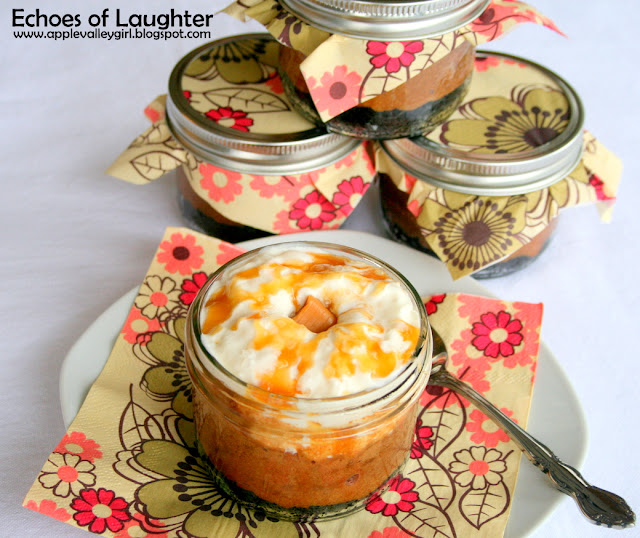
Although this original recipe from Philadelphia Cream Cheese is made in a 9 inch springform pan, I had fun playing around and making single serving cheesecakes in 250 ml wide mouth mason jars. I loved how this dessert looks in the jars!

Salted Caramel Chocolate Cheesecake
Ingredients:

•3 packages (250g each) Philadelphia brick cream cheese, softened
•1 1/4 cups OREO crumbs

•1/4 cup butter, melted

•3/4 cup sugar

•3 eggs

•4 squares Baker’s semi-sweet chocolate, melted

•3/4 cup caramel sauce

•1/2 teaspoon coarse sea salt

Directions:
1.Preheat oven to 350°F. Mix crumbs and butter. Press firmly onto bottom of a 9-inch springform pan or 12 {250 ml size} mason jars.

2.Beat Philadelphia cream cheese and sugar in a large bowl until blended. Add eggs, 1 at a time, mixing on low speed just until blended. Stir in chocolate; pour over crust, or pour into 12 mason jars {250 ml size and fill jars 2/3 cup full as filling will puff up during baking.}

3.Bake 40 min. or until centre is almost set.{If making single servings in mason jars, place the jars on a cookie sheet to go into the oven.} Run knife around rim of pan to loosen cake; cool completely before removing rim. Refrigerate 4 hours. Spread caramel sauce over top just before serving and sprinkle with sea salt.

{Here's a tip: Use the flat bottom of a glass to press the cookie crumbs in the bottom of the jars.}
I garnished the cheesecakes with whipped cream, caramel sauce, a caramel and a sprinkle of sea salt.
I love the look of desserts in mason jars...so adorable!
These are also perfect for gift giving!
Now let me tell you about this amazing contest by Real Women of Philadelphia.
{Sorry...this is open to Canadian residents only.}

Can you imagine winning free groceries for a week? How seriously cool!

Contest Details
- How would you like to win groceries for a year!? Imagine how much money you would save if all your food was given to you for free? Real Women of Philadelphia is making that dream possible for three grand prize winners, in the form of $10,000 gift certificates from your favourite grocery store.

- Sign up for the Real Women of Philadelphia online community and automatically be entered into the sweepstakes. Weekly prizes will also be drawn for Free Philly for a year!

Visit the site daily from Oct 15th – Nov 5th. Every time you post a comment anywhere on the site you automatically receive an entry to a maximum of 1 entry per day for 21 days.

- Contest opens October 15th,, 2012 and ends November 4, 2012.

Go HERE to enter this exciting contest!

Good luck!
Why Join Real Women of Philadelphia?
- Join our exciting online community for people who love to cook. Connect with cooking enthusiasts and food lovers from across the country in our Forum, share and exchange recipes, and learn valuable cooking tips from experts like Anna Olson.

- The festive season is just around the corner. What better time to check out great ideas for exciting appetizers, mouthwatering entries, and cool and creamy desserts from Philly. Impress your guest with our easy recipes that allow you to create a great meal and still enjoy your party.

Here are some great suggestions for your next party.

Cucumber Roulades
 Mini Florentine Bites

Or try one of our easy dessert ideas.

 Oreo Cookie Balls
 White Chocolate Toblerone & Raspberry Cheesecake
 Cheesecake of the Year: Pumpkin Spice Latte Cheesecake
 New Festive Cheesecake: Salted Caramel Cheesecake


Lil\'Luna
Chef In TrainingToday's Creative BlogHome Stories A2Z
that give mcdonalds coupons and 
breakfast coupons you also can find recipe from